 When it comes to a selection of fishing gear and accessories, there is no shortage of items to choose from. The market has created a solution for every fishing need you can think of and even some you would have never considered. There is even gear that is designed for gear. With so many items available, how does one know where to start… or for that matter, when to stop? Let’s take a look at the top items that you will clearly benefit from as a fisherman. We will also include a few ‘nice to have’ items for your consideration. Before We Go Before we go fishing, let’s consider these two easily overlooked but important items, a fishing license and sunblock. You can obtain a fishing license online, at Walmart, or most places where fishing gear is sold. Visit ncwildlife.org to review different license options and prices. Once your license is in your pocket, the next step before fishing is to apply sunblock. It doesn’t take long to burn in the NC sun and when the breeze is coming across the surf, you might not know you are starting to burn until it’s too late. For extra protection, consider wearing a hat and long sleeve shirt. A little protection goes a long way. Let’s stay safe from the sun so we can continue to enjoy the fun, outdoor activity of fishing for a long time. A Knife A knife is one tool that you will use consistently as a fisherman. Knives are necessary for cutting bait and cutting line. You might even want a knife for cutting fish. There are many specialty knives available on the market. Some knives are designed for the purpose of cutting bait. Other knives are built into rings that you wear on your finger and are designed to cut line. Still other knives are glorified nail trimmers that come with a string attachment so they can be worn. All of these knives will do the job they are designed to do however, you only need one knife. A decent, all purpose knife that either folds or comes with a protective sheath will work fine. Truthfully you can probably save yourself some money and get away with stealing a steak knife from your kitchen. As long as it can cut line and bait, it is all you need. Beyond this primary knife that you will carry with you when fishing, you may consider a second knife that is definitely a ‘nice to have’. A good filet knife will enhance your culinary experience. It is better to pay a little extra for a decent filet knife; one that doesn’t dull out easy. Having a sharp blade makes all the difference when fileting a fish. 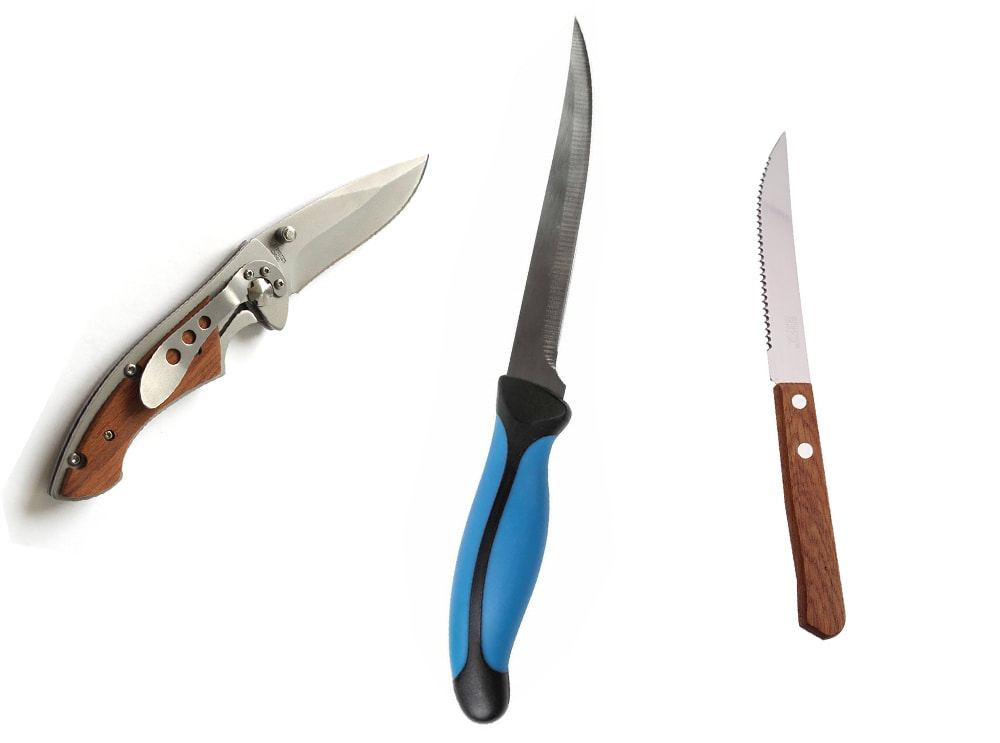 A Ruler If you are only interested in catch and release, a ruler isn’t a necessity, though your friends might ask how big your catch was and in which case, having a ruler is a ‘nice to have’. If, however, you plan to keep your catch, having a ruler can make the difference between having a nice dinner and paying a nice fine. Most fish have size limits. Keeping an undersized catch can get you in trouble with a wildlife law enforcement officer. Beyond the threat of a ticket, it’s poor sportsmanship to keep undersized fish and most fishermen want to play fair. There are many ways to measure your catch, from hard wooden rulers to retractable soft rulers. Some coolers come designed with rulers built right into the top. There are even rulers that have fish names labeled on the ruler to match the fish size limit. However, for all intents and purposes, any ruler will do. If you’re interested in saving money, a small tape measure, used for sewing or small home improvement projects will work fine. Most likely, you already own one. More important than the type of ruler you measure the fish with, is understanding how to properly measure a fish. There are two common types of measurement, total length (TL) and fork length (FL). Total length is the measurement of the fish from the tip of the nose, to the end of the tail. The tail should be pinched closed and the mouth should be shut. Fork length is the length of the fish from the nose to the inside fork of the fish’s tail. 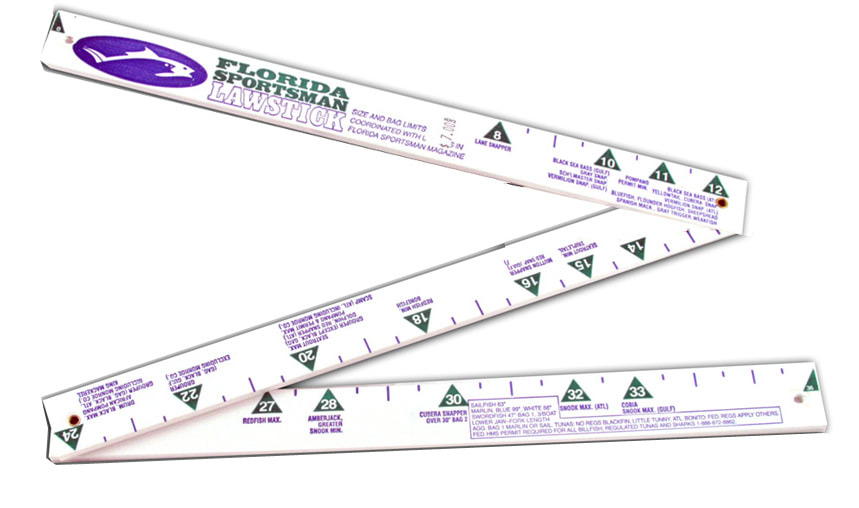 Pliers Though you can get away without having a pair of pliers, having one available can often be very helpful, especially when a hook is caught on something. Most often, the hook will be caught in the mouth of a fish. Pliers come in handy to quickly remove the hook from the fish’s mouth. This is particularly helpful when trying to keep fingers a safe distance from the fish’s mouth as would be the case with sharks and mackerels. There are several other options available on the market to assist with the removal of hooks. Hook removal tools come in a wide range of styles with varying methods for releasing a hook. While these tools perform well at removing hooks from fish, they are not always effective at removing hooks that get snagged on other objects. Pliers can effectively remove a hook from a fish’s mouth and also remove a hook that is snagged in your cast net, clothing, or other pieces of equipment. Many pliers also have the ability to double as wire cutters which can be a benefit, especially when fishing with wire leaders. Another benefit to using pliers is that they are inexpensive. Plus, you probably already have an extra pair in your toolbox. One downside to using pliers is that they can be susceptible to rust. However, rust proof pliers are available for sale and many are made specifically for salt water fishing. 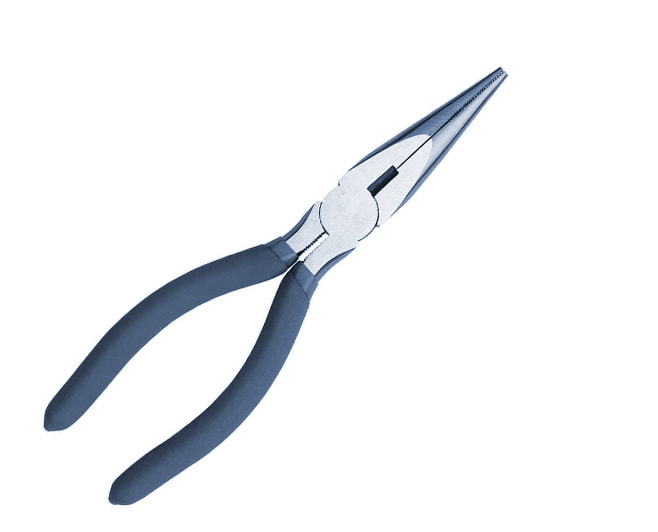 Sand Spikes Unless your plan is to hold your fishing rod the entire time you fish, a sand spike is a ‘must have’ for the surf fisherman. Even if you do plan to hold the rod when you fish, having a sand spike offers a place to set your rod down when baiting the hook or dehooking a fish. Sand spikes come in a variety of different styles. There is the very basic PVC pipe, cut at an angle at one end to make it easier to place in the sand, to more elaborate models that even have cup holders for your drinks and a shelf for cutting and storing bait. For the DIYers out there, cutting a piece of PVC pipe purchased from a local hardware store in an easy and inexpensive method for obtaining a sand spike. However, this style of sand spike is readily available precut and are not overly expensive. 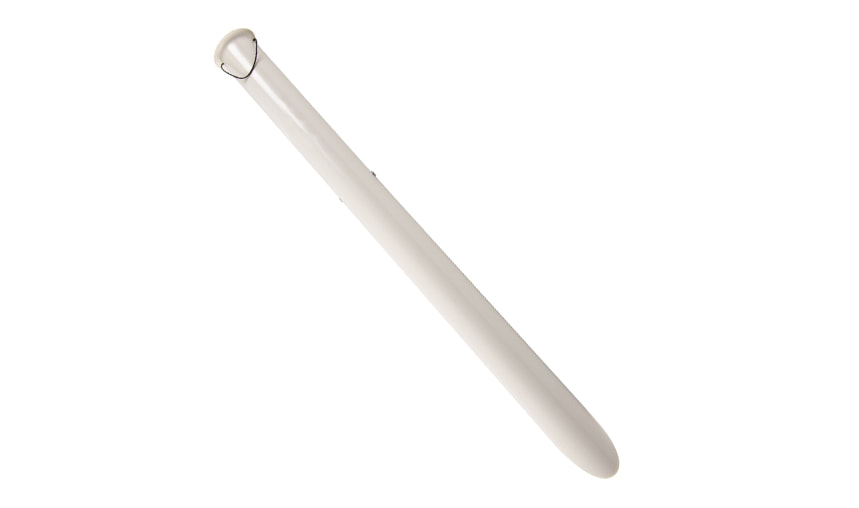 A Cast Net Most times of the year, fish are very likely to hit fresh or even frozen bait. However, in the fall when the bait is running, fish tend to snub their nose at a piece of dead bait. After all, there is plenty of live bait swimming around. For this reason, a cast net is not mandatory but it sure can be a ‘nice to have’. Cast nets come in a variety of sizes, ranging from four to twelve feet. The larger the net, the more bait can be caught with one cast. However, even smaller nets, in the four to six foot range are adequate for catching bait. Learning how to throw a cast net does require some time, practice, and patience. When deciding on which size net to purchase, consider that larger nets can be trickier to throw properly. It may be best to start with a smaller net if you have never thrown one before. Cast net can be used in the surf when the bait is running. Wait for a large school to pass by. If you throw the net before they pass they will see it coming. The are fast and can easily avoid the net. Once they pass, throw the net slightly in front of where the fish are heading.  WadersIf you only fish during the warmer months, waders may not even be on the “nice to have” list. However, if you like to fish year-round, including the winter months, waders may be essential. Though its possible to fish the surf without entering the water, many fishermen tend to wade out a little in order to put the bait right where they want it to be. While wading in August can be a relieving dip from the heat, entering the water in early March can be sobering. Instead of avoiding the water entirely during these months, consider purchasing a pair of chest waders. Chest waders won’t keep you warm but they will keep you dry, providing you don’t go deep enough for a wave to splash above the waders. To keep warm, consider wearing a pair of long johns underneath. A Tackle BoxSo far, we have talked about a lot of gear. Having a way to carry everything back and forth to the beach is a must have. There are many options including tackle boxes, bags, and buckets and all have plusses and minuses. Instead of talking about all the different options available, I’ve decided to present one recommendation and explain why it functions so well. Armed with this knowledge, you will be able to decide if the recommendation is right for you or if there are other options that meet the same criteria. Recommendation: The YETI LoadOut Bucket The YETI bucket I will be discussing is the Fully-Loaded Bucket. This bucket includes the 5-gallon bucket, the caddy, lid and gear belt. The bucket itself severs many purposes. I use it to carry the bait and my cast net in when going to the beach. If I catch live bait, I fill the bucket with sea water and keep the bait inside the bucket while I’m fishing. If I catch a fish, I toss it in the bucket when I return home.
The caddy inserts inside the top of the bucket. There are three compartments where I store fishing gear, my truck keys and my cell phone. The gear belt straps around the outside of the bucket. It has different sized compartments. In the smaller compartments, I store my fishing knife, pliers, a measuring stick. In the larger compartment I store a can of something to drink. The lid serves two purposes. First, I use it to cut bait on. Second, I sit on it when I get tired of standing. The lid cleans off easily in the surf and the bucket is sturdy enough to hold my weight. I also modified the bucket by wrapping a Bungee cord around the top of the bucket. The Bungee cord holds in place two sand spikes to the side of the bucket. There are two downsides to the YETI Bucket. First, it can be slightly heavier than the ordinary tackle box. Still, its not so heavy as to be unbearable. Second, it is pricey. There are less expensive solutions on the market. Having said that, it is quiet durable. I expect it will last a very long time.
0 Comments
 The hook catches the fish but the bait is what makes it possible. Without the bait, there is little to attract the fish to the hook. Baits attract fish but not all baits attract all fish. Unless one doesn’t care what they catch, selecting the right bait for the targeted species is imperative. Here, we will take a look at the different baits frequently used when surf fishing. We will look at what fish are attracted to each of the baits, where to locate the bait, and how to rig the bait. ShrimpIf I had to select only one bait to fish with for the rest of my life, I would definitely pick shrimp. It’s easy to cut, easy to rig, and everything likes shrimp. Shrimp comes in three forms; frozen shrimp, fresh shrimp, and live shrimp. As a rule, live bait is always better for catching fish than dead bait and fresh bait trumps frozen. However, if the fish are biting, even frozen shrimp is effective. Frozen, or fresh shrimp works partially well for the smaller species of fish including whiting, spot, puffer and pompano. However larger species, including black drum, red drum and the occasional trout can be caught on frozen or fresh cut shrimp. Live shrimp is effective for catching all these species. Shrimp in any form will also attract less desirable fish including croaker, pinfish, stingrays and small sharks. Frozen shrimp is readily available for purchase any place bait is sold including Walmart, local gas stations and convenient stores. Some tackle shops will sell fresh shrimp or it can be purchased at the local fish market. Live bait is sometimes available at local bait shops but it can be expensive. If there is access to a marsh or creek, a less expensive option is to catch shrimp using a cast net. When baiting a hook with frozen or fresh bait, it is best to cut the shrimp into pieces. The size of the piece should be determined by the size of the hook. Any excess shrimp hanging off the hook will be picked off by the fish. We want the fish to take the hook with the bait so the shrimp piece should fit on the hook. To hook the shrimp, match the curve of the shrimp piece with the curve of the hook. Slide the shrimp onto the hook till the point of the hook is barely noticeable to the touch. Fish tend to peck off the shell of the shrimp before taking the bait. For this reason, some people choose to peel off the shell. There are numerous ways to rig a live shrimp. Each method has a specific use depending on where and how one is fishing. For the purposes or surf fishing, rigging a live shrimp of a bottom rig is a common method. To do this, the shrimp is rigged through the head. Hook the shrimp through the bottom of the head with the point of the hook extending out the top. It is important to not allow the hook to go through the brain. To do this, avoid the dark spot in the shrimp’s head. 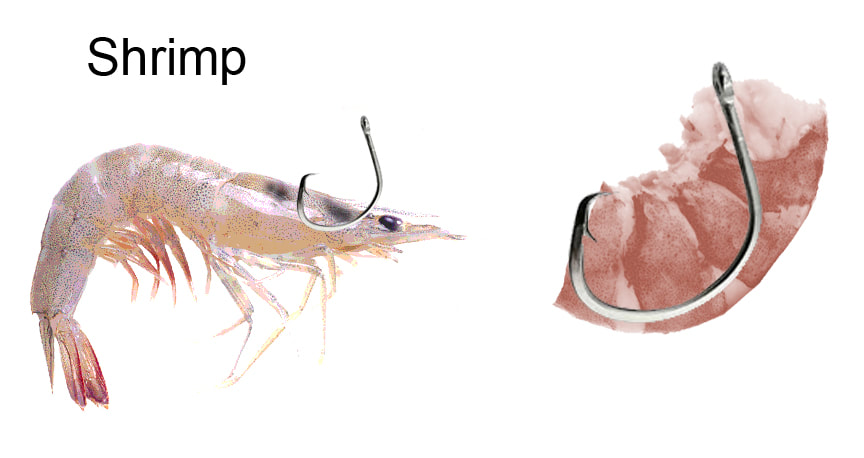 Sand Fleas Sand fleas, also know as sand crabs or mole crabs, are small crustaceans that tend to look more like insects than they do crabs. They live in sand, right at the surf edge, and borough down at lighting fast speed. Sands fleas are an effective bait for catching whiting and black drum and are also a favorite bait for catching pompano. Sand fleas can be purchased frozen but live sand fleas are more effective for attracting fish and aren’t difficult to find if one knows what to look for. Though it is possible to catch sand fleas by randomly digging in the sand, it is best to look for a colony. The colony of sand fleas will all stick their heads out of the sand ad the wave retracts from the sand. To the naked eye, this will look like a bumpy area in the otherwise smooth sand. Target this area when digging for sand fleas. Having a sand flea scoop or rake will greatly help in this process. Sand fleas can be rigged through the top, the bottom, or the side of their shells. However, sand fleas carry their eggs on the underside of their shell. Fish are attracted to these bright orange eggs. For this reason, a preferred method for hooking sand fleas is through the top of the shell with the point of the hook placed into the triangular shaped flap that protects the eggs. 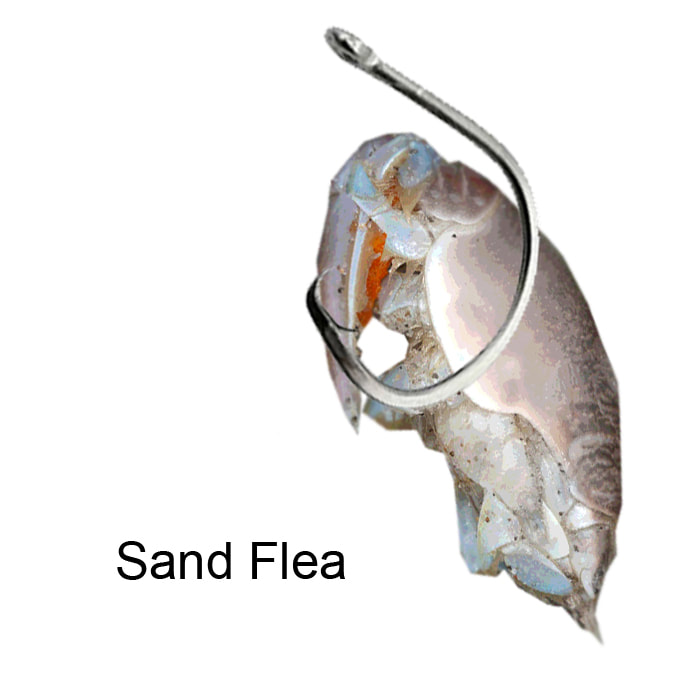 Fiddler Crabs Fiddler crabs can easily be identified because the males have one oversized claw. This claw can be as large as its entire body. Fiddler crabs make excellent bait when fishing for sheepshead and also are effective at attracting black drum. Some bait shops sell live fiddler crabs but if you have access to a marsh, you try catching them yourself. Fiddler crabs live in the muddy areas near the shoreline often where pickleweed grows. They move rather quickly and burrow into holes in the mud to hide. Often, fiddler crabs will be found in large groups. Though they have a large claw, its not difficult to quickly pick up a fiddler and toss it into a bucket before it pinches. Fiddler crabs can be rigged on a simple double drop bottom rig. Small hooks are needed for rigging fiddler crabs. Pierce the crab through one side of the bottom of the shell. Allow the point of the hook to barely be revealed though the top of the shell. Some fishermen prefer to break off the large claw before rigging, but this might be to protect themselves rather than the fish. Any fish willing to eat a fiddler crab probably won’t be stopped by the claw. 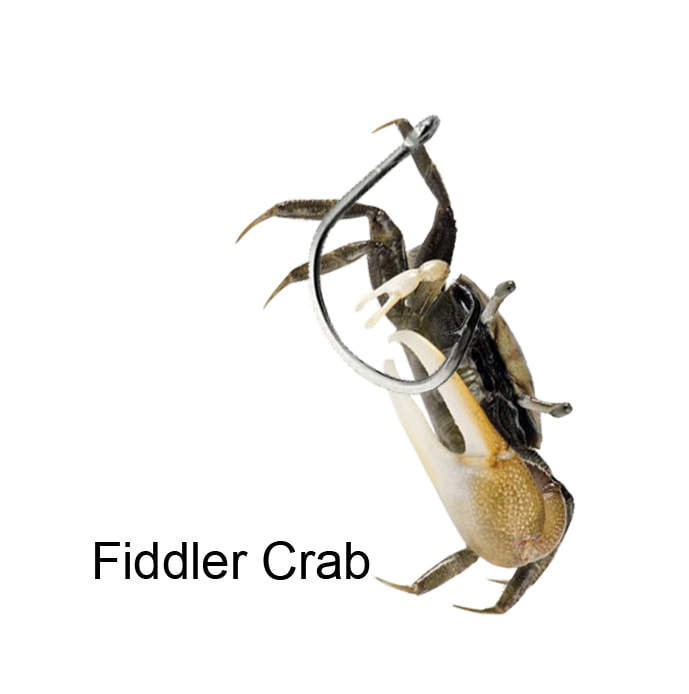 Blue Crabs Blue crabs are delicious boiled in Old Bay or a good crab boil and served with a side of butter. However, if you put one to the side before boil, they also are an effective bait for catching red drum, black drum and bonnethead sharks. Blue crabs are sold in most seafood markets but they are easy enough to catch. Keep in mind, blue crabs are regulated so make sure you understand the rules regarding sizes, limits, and methods for catching crabs. If you have access to a dock, a crab trap baited with fish heads and left over night will usually produce serval blue crabs. Another option is to use a crab line and a chicken neck. Drop the baited crab line off a dock on a creek, marsh or ICW. After a while, slowly pull the line. A blue crab will hold onto the bait all the way to the surface. Then, use a net to retrieve the crab before it drops off. Depending on the species of fish you are targeting will determine the way a crab is rigged. However, in general, most fisherman will use half the crab with the top shell removed when targeting large drum or bonnetheads. For black drum, the crab can be quartered. Break off one of the legs and rig the hook through the hole. Thread the hook through till the point starts to emerge through the bottom shell. 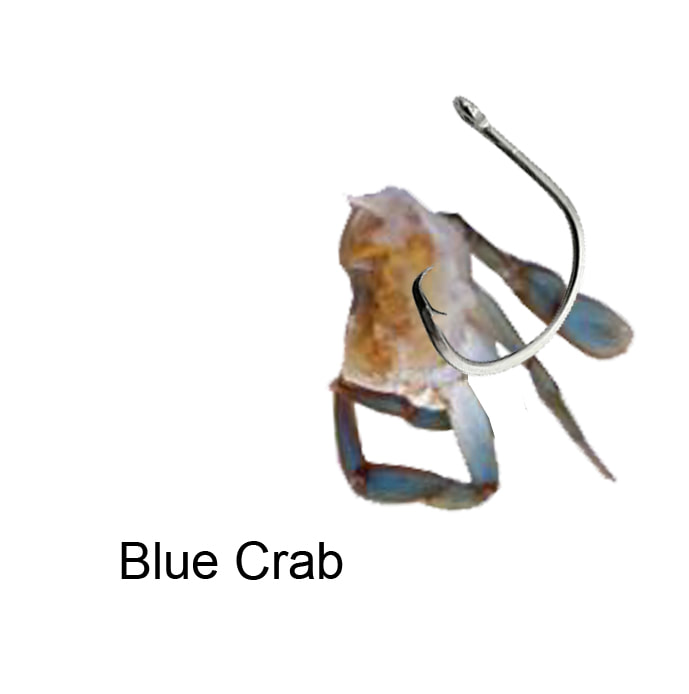 Cut Bait Cut bait refers to a piece of dead fish rigged on a hook. The size and method used to rig the hook has everything to do with the species of fish that can be caught. The larger the piece of bait, the larger the species of fish. In general, blues, red drum, and sharks are all attracted to cut bait. The type of fish used as cut bit can vary as well. Cut mullet is a popular fish used for bait however, bluefish, pinfish, and croaker can work equally well. Cut bait can be purchase at seafood markets or it can be caught in the surf. One method for rigging large pieces of cut bit is called bridling. Bridling prevents the bait from falling of the hook. It also provides a method for presenting maximum hook exposure ensuring better hook up ratios. This method starts by cutting a piece of light line or braid about five to eight inches in length. The tag ends of the line are tied together forming a loop. Using a braiding needle or other thin, sharp device, a hole is punched through the middle of the bait. The line is inserted through the hole so that both sides of the loop are visible. The loop ends of the line are then threaded through the hook. This allows the bait to hang from the hook by the line. By twisting the fish, the line will begin to wrap around the hook. After several twists, all the slack in the line will be gone and the hook will be flush with the bait. Pierce the hook through the top of the cut bait, allowing for maximum exposure. 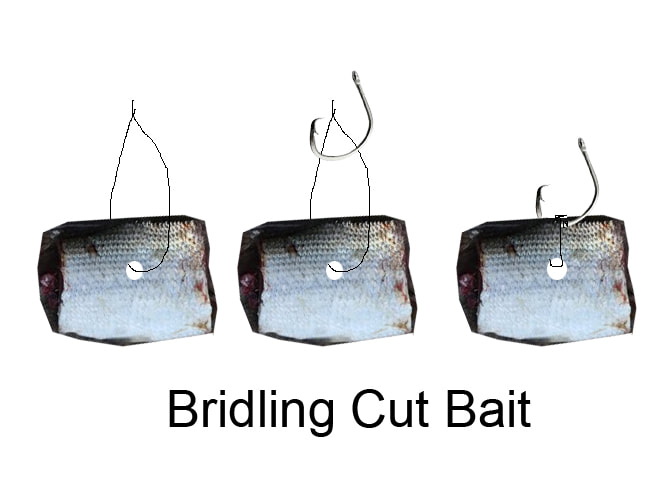 Mud Minnows and Finger Mullet Using live fish for bait, such as mud minnows or finger mullet can be very effective for catching larger game fish. Red drum, bluefish, flounder, and trout are all attracted to live fish. Mud minnow are smaller and can sometimes be purchased where live bait is sold. If one has access to a marsh or creek, starting in early spring, mud minnows can be caught in a minnow trap or using a cast net. Finger mullet are larger and show up starting in the fall. When the bait is thick in the surf, it is easy to fill a bucket with finger mullet, throwing a cast net in the surf. Finger mullet are also available, sold frozen, in most bait shops. There are two schools of thought when it comes to rigging live finger mullet. A very common practice is to hook the fish in the bottom of the lip and pull the point through the top of the nose. The nose of the fish is tough and helps hold the fish on the hook. The downside of rigging through is that smaller fish, especially blues, will cut the bait in half, leaving the head on the hook. The other option is to hook the fish near the back dorsal fin. This method might have a higher hook up rational however, since the tail of the fish is not a think as the nose, it is easier to lose bait. Mud minnows can be rigged using either method but, since the mud minnows are smaller, there is less chance of a larger fish cutting them off. For this reason, hooking mud minnows through the nose might be the preferred method. Frozen finger mullet can be effective for catching larger fish such as blues and smaller sharks, especially in the spring and summer before the bait fish show up in the surf. Frozen finger mullet can be rigged hole or sliced into smaller chunks, depending on the type of rig and size of the hooks being used. 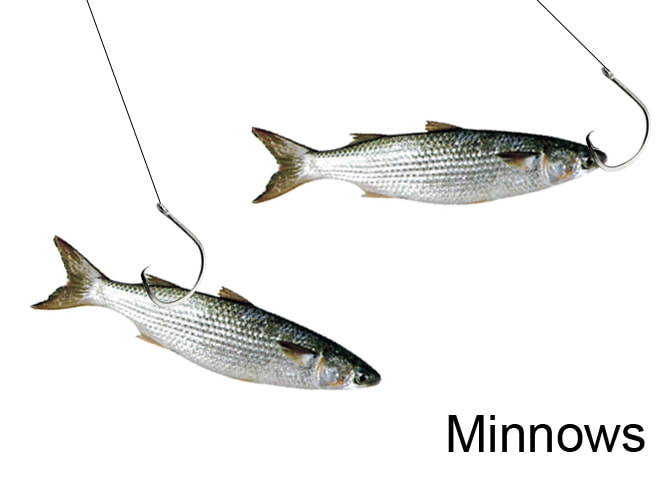 Recommendation The aforementioned baits are just the beginning of the list of baits available. Squid, clams, and bloodworms are all popular baits used when surf fishing. There are also many different types of artificial baits including fish bites, fish gum, and gulp that can be effective for catching fish in the surf.
When deciding which bait to use, beyond determining which bait will catch which fish, the best advice might be to match the bait with what is available in the surf at the time. For example, if bait fish, such as finger mullet are running thick in the surf, fish using live finger mullet. If live shrimp are popping in the marsh, fish with live shrimp. If, however, you are in a situation where you can only purchase frozen bait and are trying to decide which bait would be best, the recommendation would be to use shrimp. Everything likes shrimp. 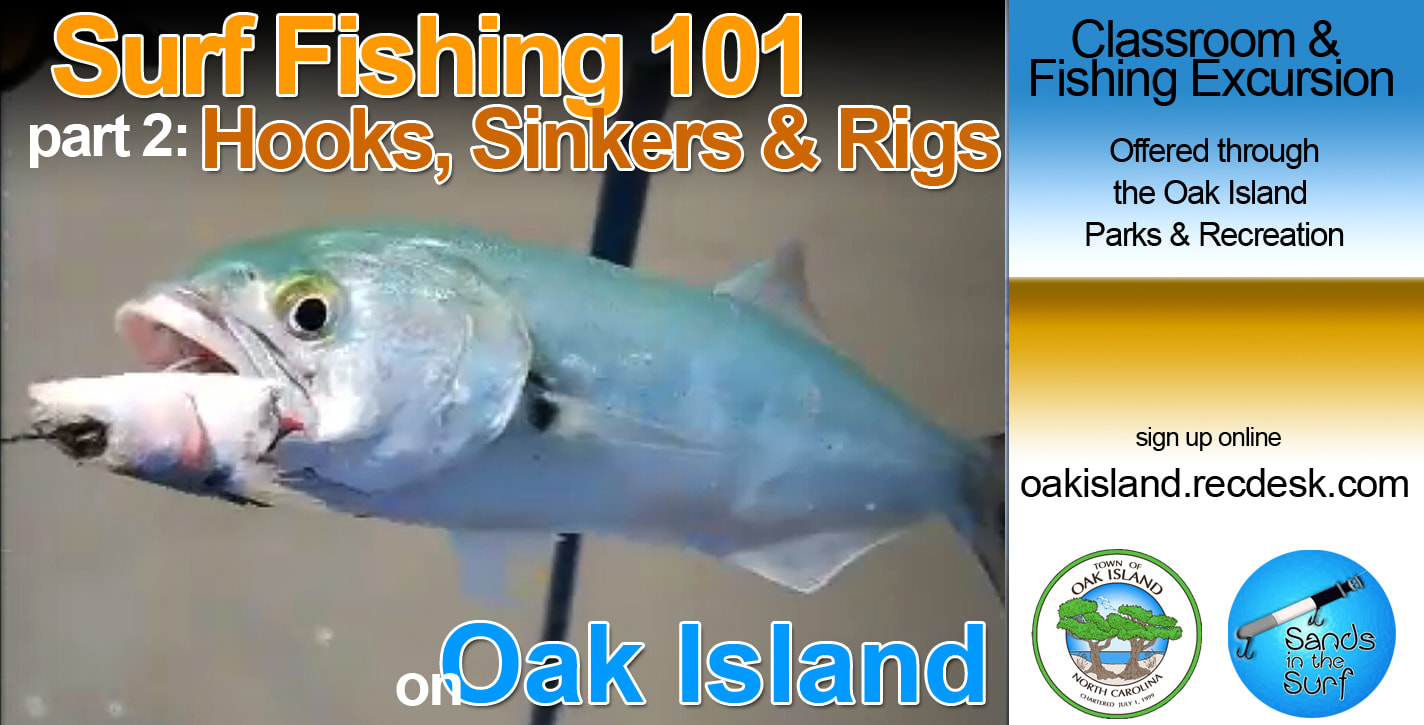 If you read through part one of this series, you have your rod, reel, and line all ready to go. All you need to do now is tie on a hook, right? Well, it might be a little more complicated than that. In fact, if you’ve walked through any sporting good shop, then you already know how overcomplicated rigging a rod and reel can seem. There are rows and rows of hooks, lures, and rigs. Not to mention the freezer is filled with boxes and containers of frozen sea creatures, aka bait. How do you know what to get? Let’s be honest, you don’t want to spend the afternoon in the store, you want to spend it in the surf. Well, we’re about to break it all down into the basics so you can decide what rig and bait is right for you. You need two things tied to the end of your line in order to catch a fish. You need a hook to hook the fish, and you need a weight to cast the hook towards the fish. It’s really no more complicated than that. Rigs are basically a combination of those two items. The only difference is how the hooks and the weight are arranged. Before we look at rigs, let’s review some of the more common hooks and weights used when making a rig. HooksThere are almost as many different styles and brands of hooks as there are fish is the sea. It can easily become overwhelming trying to decide which ones to purchase. In order to simplify the confusion, let’s look at the basics. Although there are many variations of hook designs, most branch off from three common types; the treble hook, the J-hook, and the circle hook. Treble HookThe treble is a three-pronged hook often used on lures. Pier fisherman will often use a treble hook with a live shrimp suspended beneath a float to catch trout. On the end of the pier, pin riggers will us a rig made of treble hooks to catch king mackerel. As you gain experience surf fishing, you may find a rig you’ll want to try that utilizes the treble hook. For now, however, will we focus on the single pronged hook. J-HookThe J-hook is another very common hook used by fisherman especially when targeting puffer and bluefish. As the name suggests, the J-hook is shaped like the letter J with a long shank. This long shank can protect the line from being bitten off and is the reason it is used to catch those previously mentioned species. One of the downsides to the J-hook is that the hook must be set in the mouth when the fish takes the bait. If not, the fish can lose the hook or the fish can swallow the hook, causing what is referred to as ‘gut hooking’ a fish. For this reason, we will bypass the J-hook for now. Circle HooksThe circle hook gets its name based on the way the point circles back towards the shank. When looking at a circle hook for the first time, one might question how a fish could get hooked at all. It appears that the circle shape would make it difficult for the point to stick the fish. However, the opposite is actually true. When a fish takes the bait and turns away, the circle shape causes the hook to turn as well. This results in the hook circling right into the side of the fish’s mouth. The fisherman doesn’t need to set the hook. The hook does all the work. The hook up rate is higher and gut hooking is lower. For these reasons, the circle hook is the recommended hook for the novice surf fisherman. 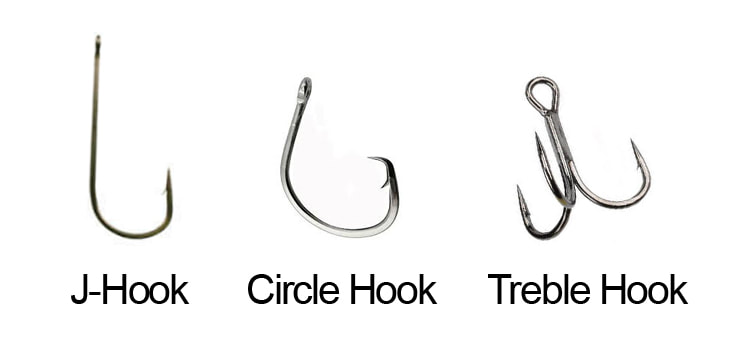 Hook SizesNow that we have narrowed down the search for the type of hook we need, the next step is to decide the hook size. One way to do this might be to look at the hooks and pick a pack that looks right to you. However, there is a better way. Each package of hooks is labeled with a hook size number however, it is a little tricky to understand at first. This is because there are two different numbering methods for hook sizes; regular numbers and aught sizes. Let’s start with aught sizes. Aught sized hooks are labeled with a number followed by a slash and a zero. For example, a one aught hook would be labeled as such, 1/0. Understanding how aught hooks are sized is straight forward. Smaller sized aught hooks are labeled with smaller aught numbers. For example, in a set of aught hooks ranging in size from 1/0 to 3/0, the 1/0 would be the smallest. The 2/0 would be larger than the 1/0. The 3/0 would be the largest in the set. Understanding how regular numbered hooks are sized is a bit trickery. They are actually sized the opposite way aught hooks are sized. With regular sized hooks, the bigger the number the smaller the hook. For example, say we had a set of hooks ranging from #1 to #3. The #1 hook would be the largest hook in a set. The #2 hook would be smaller than the #1 and the #3 would be the smallest. There is a misconception that salt-water fishing requires bigger hooks. In theory this makes sense. Bigger fish should require bigger hooks. However, the truth is, you can catch some really big fish on a small hook. There is no need for a 5/0 hook unless you plan to land sharks. You can catch most any gamefish fishing with a #1 to a #1/0 hook. Depending on the fish being targeted, this range might alter slightly. For example, pompano have smaller mouths. When targeting pompano specifically, a #2 hook might perform better. Likewise, when targeting bluefish, a #2/0 hook will work. However, in general, sticking to the #1 to #1/0 range is a winning game plan. 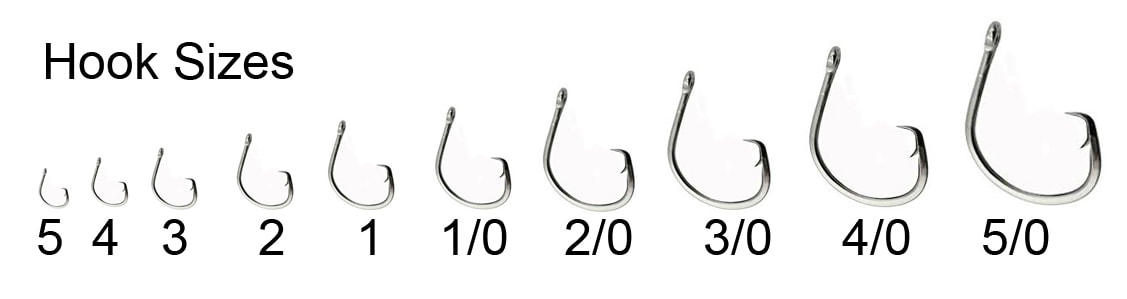 SinkersSinkers come in several different shapes and sizes. Each have specific designs to allow for different functions. However, they all have two things in common. They are each designed to provide the weight needed to cast the hook towards the fish and they are each designed to allow the rig to function properly. First, let’s discuss the function of each type of sinker. Pyramid SinkerThe pyramid sinker is one of the most commonly used weights in surf fishing. Pyramid sinker usually have four sides, though they also come three sided, have an eye at the top, and come to a point at the bottom. Pyramid sinkers are designed so that the point end sinks into the sand, preventing the sinker from moving in the surf. These sinkers easily attach to store bought, double drop bottom rigs which is one reason they are widely used in surf fishing. Sputnik SinkerWith four extending wire arms, sputnik sinkers are rightly named because they resemble the Russian made satellite that orbited the earth back in 1957. Sputnik sinkers are best used to replace the pyramid sinker when the ocean conditions are too rough for a heavy pyramid sinker to hold. When the sputnik hits the surf bottom, the four extending arms burrow into the sand. These wire arms work extremely well at holding the sinker in place. When it is time to retrieve the sinker, the sputnik performs another trick. The wire arms break loose from their position, allowing the sinker to release. Upon retrieval, all the fisherman need do is resent the wire arms back into position and the sinker is ready for another cast. Egg SinkerAn egg sinker is an oval weight with a hole that runs end to end. To attach the sinker, the line is threaded through the hole. This allows the egg sinker to slide up and down the line. Egg sinkers work well with rigs such as the Carolina rig that allow the bait to move away from the weight. Since the egg sinker is oval, it doesn’t have the points or wires to hold it to the surf bottom. This makes it an affective weight to use in situations when you want the rig to move with the current. 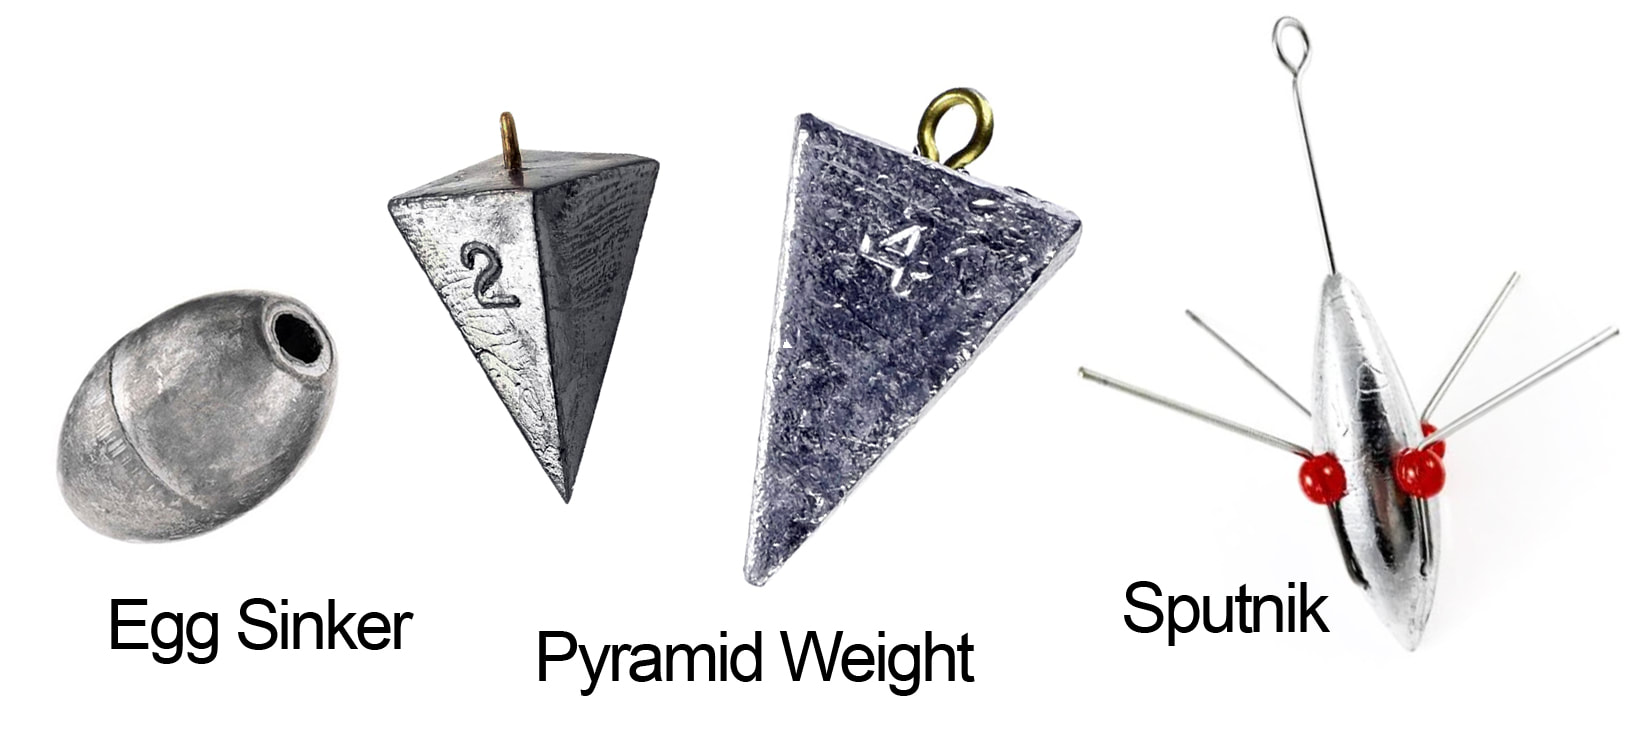 The Weight of the WeightSinkers come in a range of weights starting as low as one ounce and lower and as heavy as eight ounces and higher. However, for the purposes of surf fishing, the range usually falls between one and four ounces. Deciding on the right weight is primarily determined by water current as well as how far the fisherman wants to cast the rig. The basic rule when determining the right sinker weight is to use the least amount of weight necessary to hold the bait in place. If the water current is calm, a two-ounce weight might be suitable. If the current is pulling the line towards the shore, then a four-ounce weight will be needed. The second consideration when selecting the right sinker weight is deciding how far the cast needs to be. A heaver weight will cast further than a lighter weight. More often than not, the fish are closer to the shore and long casts are not necessary. However, sometimes, particularly during low tide, the breakers will be further away from the shore. In this case, a heavier weight will be needed to reach the fish. Taking all this information into consideration, if there could only be one size and shape weight in the tackle box, a four-ounce pyramid weight would be the go to weight. RigsNow that we have a better understanding of the different types of hooks and weights, let’s look at two very common rigs. Both are effective for catching fish. The reason to use each will be based on the fish you want to catch, the bait you want to use, and personal preference. Double Drop Bottom RigFor those who are new to surf fishing, the double drop rig is a great starting rig. It’s easy to use and versatile enough to catch most fish you’ll find in the surf. In fact, I can’t think of a fish, from blues to reds, to black drum to puffer, to spots to whiting, and even small sharks, that I haven’t caught on a double drop rig. Double drop rigs are also available premade, wherever fishing supplies are sold. Store bought double drop rigs come in a variety of styles. Some have different colored beads, some have different ways of attaching the weight, and some are made of heavier line than others. Some are even made of steel leader. However, they all have the basics in common. They each have a place to attach a weight at the bottom. A main line leads to another line that runs perpendicular to the main line. At the end of that perpendicular running line is a place to attach the first hook. More of the main line follows and then a second, perpendicular line extends for the second hook. Then more main line that ends with a swivel used to attach the rig to the line that extends from the reel. Sound complicated but simply put, it’s a rig with a weight and two hooks. Carolina RigCarolina Rig, also called a fish finder rig, is the second rig you’ll want to learn and gain experience with surf fishing. This rig has a hook on the end followed by a mono leader that is tied to a swivel. The line from the reel is then tied to that swivel. Instead of being on the bottom of the rig, the weight is placed on the line above the swivel. This allows the line below the weight, which includes the hook and the bait, to move with the current. It also allows the line to be picked up by a fish, which tends to be more natural and less likely to spook the fish. Though there are variations of the Carolina rig available for purchase in stores, it is easy enough to create your own, making it a good first rig to learn when making rigs. Perhaps one of the biggest benefits to learning how to make your own Carolina rig is the ability to adjust the hook, weight and line, depending on your targeted species. A Carolina rig can be created with a #1 circle hook, 15lb mono and a 2 oz egg sinker to catch whiting. The same style Carolina rig can be created with a 5/0 circle hook, a steal leader to 50lb mono line, with a 4oz pyramid weight to handle 4-foot sharks. RecommendationBetween hooks, sinkers and setups, there are endless combinations of rigs that can be created. Learning about which rig is best for each species of fish can be a lifetime process. For the novice fisherman who isn’t sure where to start, here is my recommendations.
A simple, store bought, double drop bottom rig, with a #1 to #1/0 circle hook and a four-ounce pyramid weight will catch most every species of gamefish in the surf. 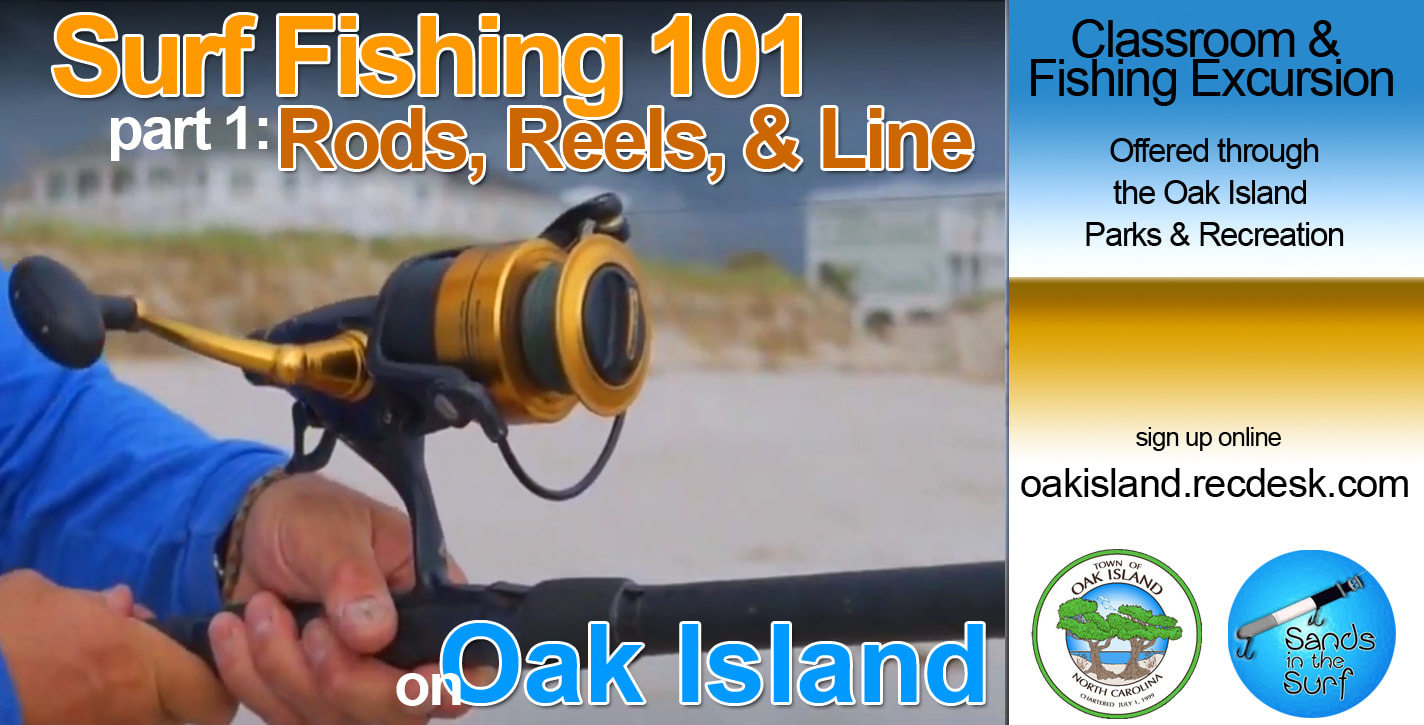 I grew up fishing on a lake for bluegills and bass. I liked to fish but had little experience with salt water fishing. When I moved to the coast, I had no idea how to surf fish. I didn’t know about rigs, I didn’t know about bait, and when I was lucky enough to catch a fish, I didn’t know what I caught. The one thing I knew was that it was fun. Surf fishing is fun even when you don’t catch fish. You feel the surf as it splashes on your feet. You smell the salt air as the breeze rises from the waves. You feel the heat of the sun as it shines down on your face. Then you feel the tug on your line and you forget about everything else. All you can do is focus on the rod and reel. Surf fishing is fun but when you catch a fish, surf fishing is really fun. If your story is similar to mine, if you're excited about fishing but aren’t experienced with surf fishing, your going to want to keep reading. We’re going to look at everything you need to get started surf fishing. From rods and reels, to hooks and rigs, to bait and buckets, you’ll have all the knowledge necessary to catch that first fish. Rods & Reels If you want to go fishing, you’re going to need a rod and reel. Seems easy enough, that is, until you realize how many different types of rods and reels there are to choose from. There are different types and sizes. There are different lengths and definitely different prices, so how does one know where to start? First, let’s break it down into easy to digest parts. RodsThe first thing you’ll want to consider when purchasing a rod is length. Most rods range from six to twelve feet. In general, the longer the rod, the longer the cast. Shorter rods, in the six- to eight-foot range, can be used for surf fishing but are really better suited for pier, dock or boat fishing. A ten- or twelve-foot rod can get you past the breakers when you need to. However, keep in mind the longer the rod, the heavier it will be. Match the rod to your physical strength. The next thing you’ll want to consider is the rating. If you look on the rod, you will find writing that provides the rod’s length, rod power, and line and weight recommendations. To simplify this, pay attention the weight (sometimes labeled lure) recommendation. If the weight/lure can handle 4 – 6 oz and heavier, you’re probably good to go in the surf. Anything less than 4oz won’t be sufficient in heavier surf conditions. Lastly, you’ll want to consider the action of the rod. If you hold the rod in your hand and shake it a bit, some rods will only bend slightly. This is called a fast action rod. Other rods will bend a whole lot. These rods are called slow action rods. There are pluses and minuses to each. The more action the rod has, the more it bends, the less accuracy there will be when casting. Personally, I prefer the fast action rod. When I cast, I have a good idea of where I want my rig to land. With my fast action rod, I’m usually pretty good at hitting my target. I also find that the hook up is better with my fast action rod. However, this is my opinion. Others might disagree. ReelsThere are several different types of reels that are used for salt water fishing. These include the conventional, baitcaster, and spinning reels. There are differences to each and every fisherman has their preference and opinion as to why one is better than the others. However, since this article is written with the beginner surf fisherman in mind, I’ll cut right to the chase. Buy a spinning reel. Spinning reels are easier to learn to use, readily available, and to some degree, less expensive. Just like there are different size rods, there are different size reels. While rods are measured in length, which is a consistent way to measure, reel sizes are measured by numbers. Unfortunately, not all manufactures use the same numbering system. This can make selecting a reel based on numbers less predictable than selecting a rod based on length. With that in mind, many manufactures do adhere to a familiar numbering system. Reels are often sized using a four-digit numbering system. In general, the smaller the number, the smaller the reel. Small reels will have numbers ranging from 1000 to 3000. Medium sized reels will be numbered around 3500 to 5000. Larger reels are numbered between 5500 to 7000, though you can get spinning reels even larger than that. When considering a reel size, understand that the smaller the reel, the less ability it will have to hold line, weight, or supply power needed to reel in a fish. Smaller reels are not adequate because they aren’t powerful enough for handling the rigs used or fish caught when surf fishing. Better suited are the top ranged medium reels or lower ranged larger reels. In other words, reel sizes between 5000 and 6000 will work well. Similar to rods, the larger the reel the heavier it will be. Fishing with a 7000 reel could become taxing on the body after a while. LineReels, just like rods, have ratings. These ratings are usually written on the spool and identify how much line a reel can hold. These written ratings can help you when you purchase line for your reel. Larger reels can hold more line. How much line also depends on the type of line that will be used; mono or braid. Monofilament, frequently referred to as mono, is nylon fishing line. The benefit of selecting mono is that the nylon will 'give' when pulled. In other words, it stretches when a fish tugs, then returns back to its normal state. Imagine a rubber band being pulled. Of course, the rubber band analogy is an over exaggeration but it demonstrates the concept. Mono is also less expensive than other types of line. The downside to mono is that it is thicker than braid. This means less yards of mono line can be spooled on the reel. Braid is made from fibers. Where mono feels like plastic, braid feels like strings. The benefit of braid is that it is thinner than mono. This means you can spool more yards of braid than you can mono. This also makes it stronger per size. For example, 20lb braid is much thinner than 20lb mono. The cons of braid include the price. Braid is more expensive than mono. It also doesn’t have the ‘give’ that mono does. For this reason, fisherman who use braid, often tie a mono leader to their rig; but more about that when we discuss rigs. Which line is better? That is an argument many fishermen have strong opinions about. Both have advantages and disadvantages. Considering your reel and rod ratings and your wallet will help you make the choice that is right for your situation. Recommendation: The information provided should help you decide the rod, reel, and line for your surf fishing experience. However, there are still factors we have not covered, including brand names, quality, and pricing. These types of decisions need to be determined based on your personal preference and financial situation. If, however, I were asked to recommend a surf fishing setup regardless of name brand or price, I would suggest the following. Rod: 10 to 12-foot, fast action, that can toss 4-6+ oz weight. Reel: size 5000-6000 that can hold 250 yards of 30lb braid. More Information
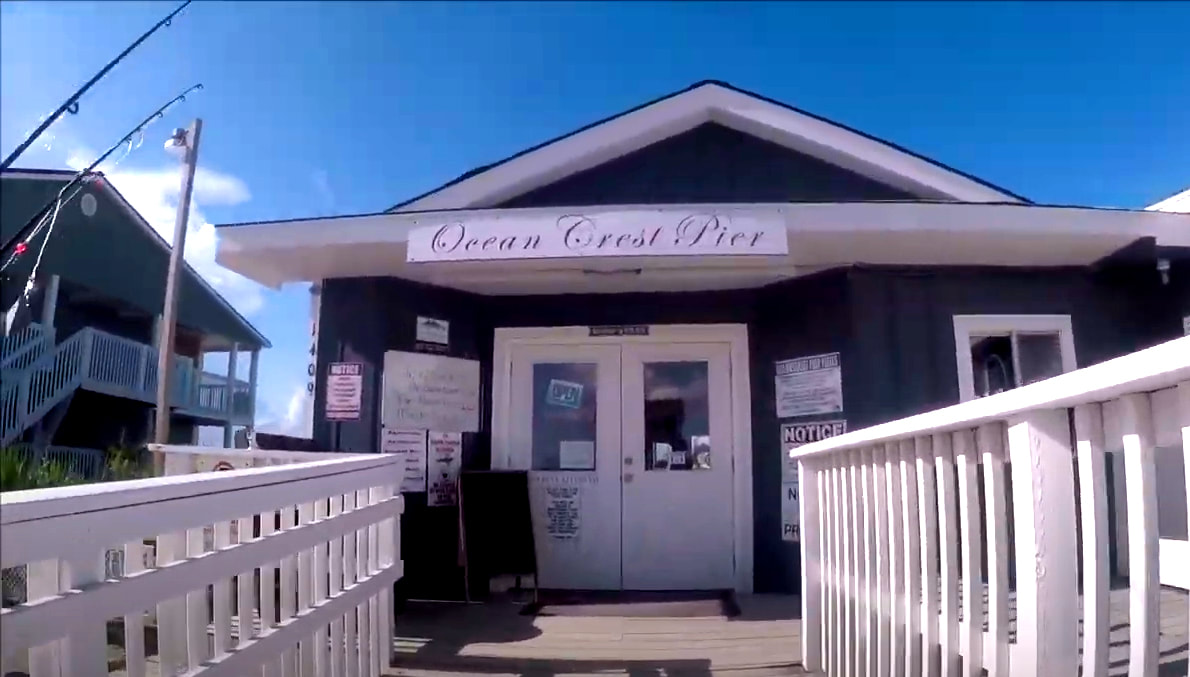 I love surf fishing. I could spend all day standing in the sand, casting towards the breakers and catching anything that’ll bite the bait. However, sometimes when I go, I look up and see people standing on the pier with a rod in their hand. I figure, there must be a good reason why they’re up there and I’m down here. I can’t help but wonder, is fishing on the pier is really worth doling out cash? Fishing the surf is free. And while I’m not a miser, I still value my hard earned cash. Also, the pier can be crowded at times and if your not careful, there is a good chance you’ll tangle up with your neighbor. Plus, there is no guarantee that you’ll catch anything more spectacular standing on the pier then you will in the surf. All these thoughts led me to do a little research and I found there might be a few reasons to get out of the sand and stand on the wooden planks. So while I still enjoy fishing the surf, before we disregard the pier entirely, consider these top ten reasons why it might just be worth the ten bucks. 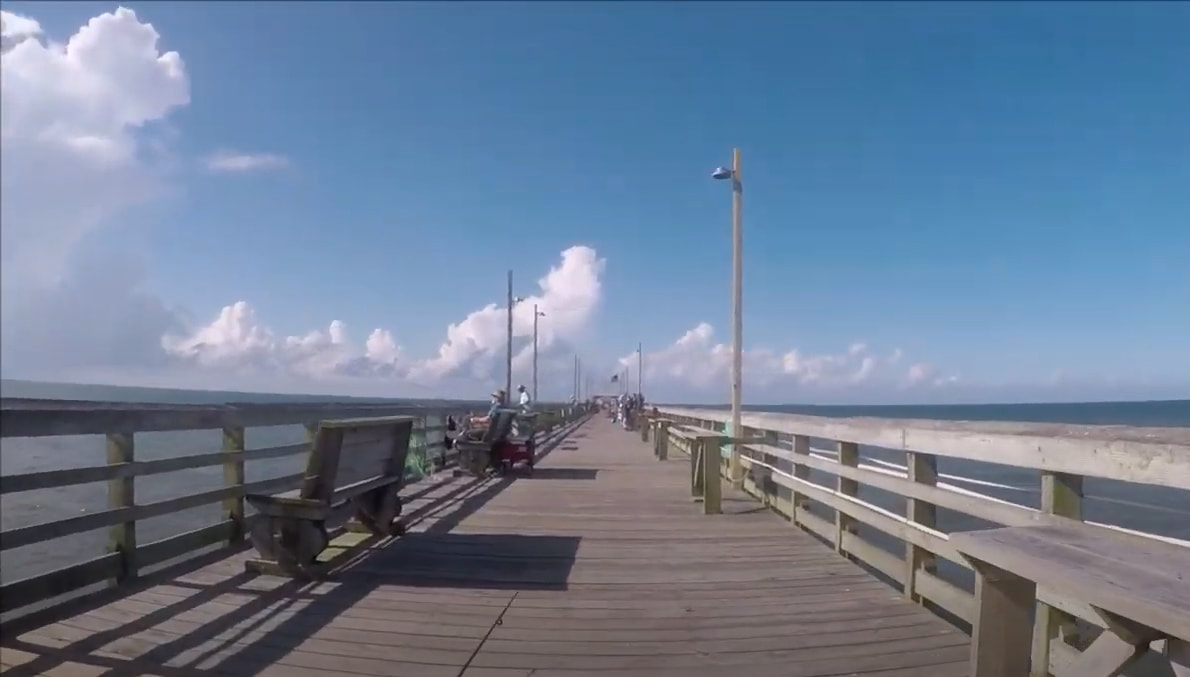 #10 No Sand Sand. It gets in your shorts, your gear and your hair (assuming you have hair). Sure, it’s nothing a hose can’t take care of but imagine getting back in the truck and not needing to vacuum the floor mats. That alone might be worth the ten bucks. #9 No Need to Wade I don’t mind getting wet. At least not mid summer when is 90 degrees. However, I enjoy fishing all year long. That includes the fall and the spring when the water temp is less than pleasant. When on the pier, I stay dry all year long. #8 No Swimmers It never fails. The beach will be empty but as soon as I cast a rod, someone walks down and starts swimming right where I’m fishing. This doesn’t bother me if I’m shark fishing. Please, splash around like a wounded fish. You’re better than chum. Still, I’m not trying to plant a 5.0 hook in someone’s thigh. At the pier, most people are smart enough to not swim too close. At least, we can hope they read the signs.  #7 No License Required I live on the coast and have a sportsman license but most of my relatives don’t. If they’re coming down, they might only want to go fishing for a day. The pier carries a blanket fishing license that covers all guests who purchase a fishing pass. This means uncle Tommy can fish all day long without worrying if he’s doing anything illegal. There’s a first. #6 Structure I fish the southern facing beaches which for the most part are as flat as a day old open bottle of cola. Fish however like structure. The pier is structure. Fish migrating up the coast will get hung up by the pier with its barnacles and small crustaceans. This should increase your chances of catching fish. #5 Go Shopping I’ve usually got a decent supply of gear in my tackle box. Still, whether it be hooks, weights or rigs, there always seems to something I’m running short of. Whatever I need, chances are they sell it at the pier. This includes bait, which means if the fish are biting squid and all I have is shrimp, I can get what I need so I’m not left out.  #4 Don’t Go Shopping You ever have this happen to you? You show up to fish and you forgot to bring your rod!? Ok, it never happened to me either but if it did, it wouldn’t stop me from fishing the pier. That’s because you can rent a pole right there in the shop. #3 Community Perhaps one the best reasons to fish the pier is the community. There is a blessed mix of newbies, those who know what they’re doing, and old salts. Each of these stereo types can learn something from the other. You don’t even need to talk, you can just watch and learn. However, you’ll want to talk. Sharing experiences, fishing stories, tips and tricks is worth ten times the ten dollars you’ll pay to be surrounded by people who share your passion and their knowledge.  I asked a fisherman on the pier the exact question I started this article with, "Why is it worth ten bucks to fish this pier?" Without hesitation he explained, #2 and #1 “They sell beer and they have restrooms.” Enough said. Sure, we all want to hook a citation but even if you don’t, there is more to the pier than the catch. Check out the video to see the Ocean Crest pier in action!
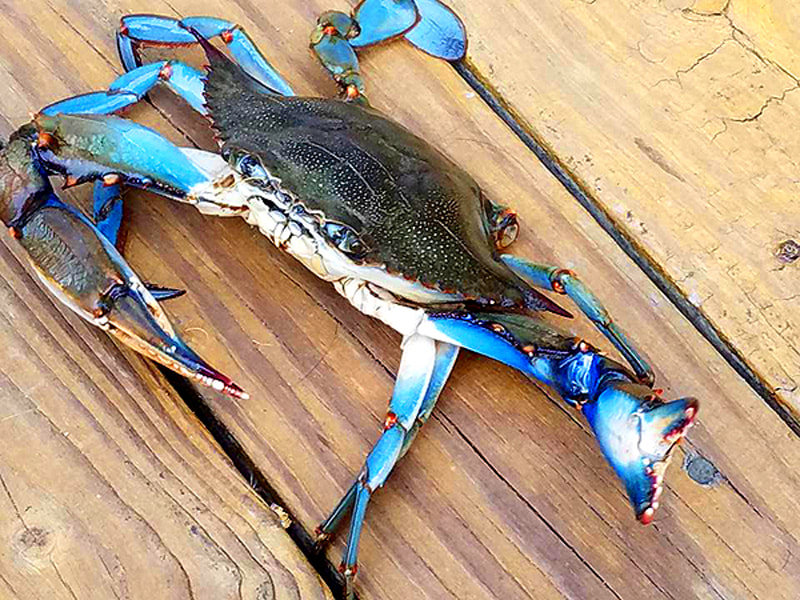 About CrabsYou had a great day fishing in the surf. You caught a few keepers and you can't wait to get in the kitchen and fix up some delicious fish tacos. But hold up.... what about the appetizer? Or better yet, the crabatizer! Crabbing is a fun activity that everyone in the family can enjoy. It doesn't cost much to do and you really don't need any special skills (except a little patience) in order to accomplish the task. Here's how to get started. How to CrabThe cheapest and perhaps most fun way to catch a crab is by hand. All you need is a string and a chicken neck. Most of the bait shops sell crab hand lines for only a few bucks. This is basically a large, weighted pin that holds the bait attached to a string. While you're in the bait shop, look in the frozen bait section and check for chicken necks. They usually come a few in a package. However, if you caught fish, attaching the fish head to the line will work even better. Crabbing is easiest to do off a dock. All you need to do is lower the bait into the water so it reaches the bottom. Then wait. Sometimes you will notice the crab trying to walk away with your bait. When this happens, slowly pull the up string. When you can see the crab, stop pulling in the line. You don't want to try to pull the crab out of the water. If you do, most times the crab will let go and you'll lose it. Instead, use a net to scoop the crab out of the water. It also helps to have a bucket ready to put your crabs in. If the place you are staying has access to a dock, then you might consider purchasing a crab trap. A crab trap is a wire box with a trap door at the bottom for adding bait. The crab trap will also have holes on each side. These holes are designed so the crab can enter the trap but can not figure out how to escape. Once the bait is in the trap, again fish heads work great, tie the trap to the dock and lower it into the water. Keep in mind that the tides will change. Try to place the trap where it will still be underwater during low tide. Also take into consideration any boat traffic that may be in the waterway. Neither you nor the boat owner will be happy if the trap gets caught up in a prop. Once the trap is set, walk away. Leave it sit over night then check it the next day. This gives the crabs time to find and climb inside the trap. If there are crabs in the trap, you're ready for dinner! If there is only one or two and you want more, make sure you add bait. If there isn't bait in the trap, the crabs will turn on each other. There are several types of crab traps available for purchase. If you are considering purchasing a trap, check out the video above for an explanation of the pros and cons of different crab traps. 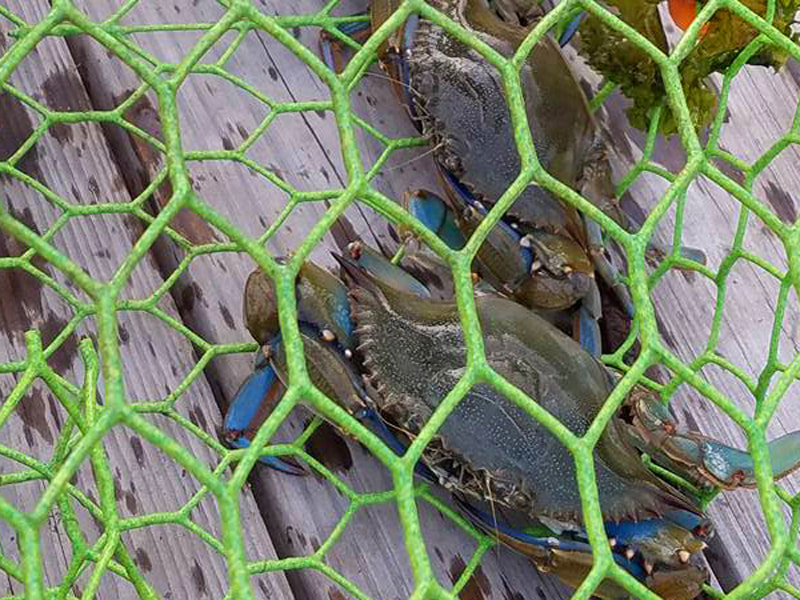 Where to CrabWhen it comes to finding a place to crab, there are a variety of options to choose from. As mentioned above, if you are staying on Davis Canal or the ICW, you can crab right in your own backyard with a crab trap. However, if you are not, don't worry. There are lots of places to crab with a hand line. For starters you might consider one the Oak Island public accesses to Davis Canal. There is a popular one located at Southeast 40th Street. There is another spot at Northeast 78th Street at East Yacht Drive. Additionally, you might consider crabbing in the ICW. There is a fishing dock at the end of W Oak Island Drive and W Yacht that is great for crabbing. Another option is to drive to the west end of the island and crab on the ICW side. While you're there, you might try a little clamming too. Cooking CrabsCooking crabs is easy. It only takes a few ingredients and about 15 minutes time. There is one 'catch' to cooking crabs; you have to cook them alive. When a crab dies, it starts to decay very rapidly. That doesn't sound very appetizing. To keep crabs alive, place them in a paper bag and then place the bag in the fridge till your ready to cook. Bring a large pot of water to a boil. If you want to get fancy, add a beer to the water. For the best tasting crabs, you'll want to season the water. Crab boil is available in the grocery store in both liquid and powder form. Old Bay is another option. Don't be stingy with the Old Bay. Once the water is boiling, drop the live crabs into the pot and cover. This is not for the faint of heart but you can do it. Bring the water back to a boil and cook 10 to 15 minutes. The crabs will turn bright red and float to the top. Sprinkle them with some more Old Bay and serve with a side of dipping butter. 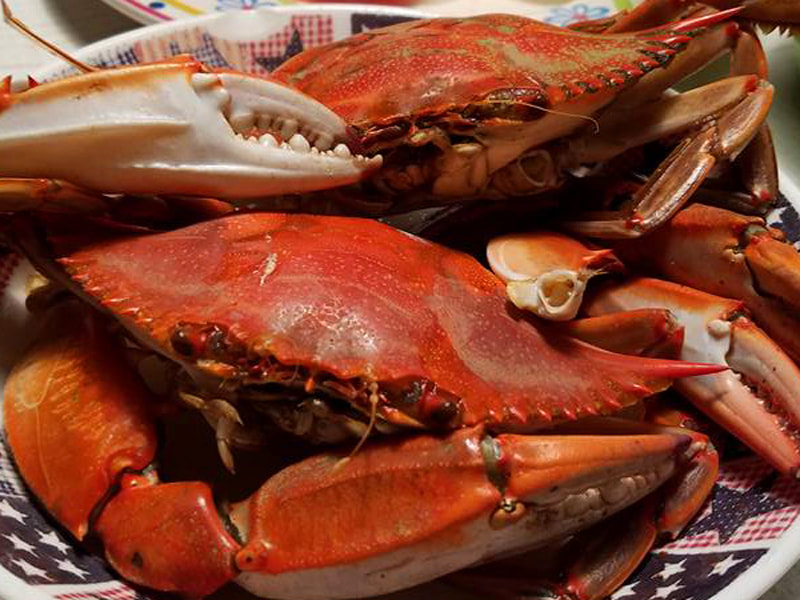 Crabbing on Oak Island can be a fun and tasty experience. However, just like all fishing, some regulations apply. There are restrictions on female crabs, crab sizes, and where and how you can use a crab trap. Make sure you know the rules before you start crabbing. And more importantly, don't get pinched!
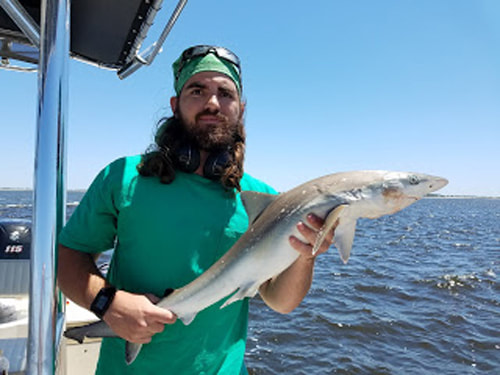 During the Oak Island summer, the fishing slows a bit. The water warms and, just like us on those dog days of summer, the fish get lethargic. This doesn't mean you can't catch something that can put up a fight. With the right rig and bait, a shark can give you a run for your money. The idea of shark fishing might conjure up an image of Quint strapped into his chair on the Orca, fighting a twenty foot great white... twenty five. Yes, there are plenty of large sharks right off the beach on Oak Island. However, this post is going to focus on the sometimes overlooked, but smaller variety of sharks such as the Atlantic Sharpnose and the Bonnethead. The adult size of these sharks typically range in length from three to four feet. There are a few things to keep in mind when you do decide to go shark fishing on Oak Island. First, identifying sharks can be particularly difficult. Visiting any Facebook group that has a post asking for a shark ID and you'll find many people arguing over what species of shark is pictured. Being able to identify sharks is particularity important if you decide to harvest one. Most sharks are protected by law. This post focuses on two of the more easily identifiable sharks. Make sure you study how to identify these sharks and also know the laws regarding both fishing and harvesting sharks. The RigCreating a shark fishing rig takes a little time and know how. It's a little more complicated than walking into a bait shop and buying a double drop rig. While you can purchase store bought shark rigs, it's not to difficult to create your own. Making your own rig has the advantages of being able to customize the rig to fit your gear and fishing conditions. Gear: Even a small shark can put up a big fight. Before you start, make sure your gear can handle reeling in a three to four foot shark. This means a heavy duty reel, in the 4000 to 6500 range. Your rod and reel must also be rated high enough to hold the line needed when the shark goes for a run. The last thing you want to happen is to hook up with a shark, only to get spooled. Hook: NC law now requires all recreational fisherman to use circle hooks when fishing for sharks. For the sharks we are targeting, something between a 5/0 and 7/0 circle hook will work well. Fishing Wire: Your hook needs to be connected to a foot or two of fishing wire. If not, chances are great that the shark will simple bite through your line. AFW sells fishing wire in various sizes from #5 - 44lb test to #18 325lb test. For small sharks, something between # 6 and #8 will work fine. Monoleader: Also called a shock leader, having two or three feet of this line allows some give when the fish pulls. The mono leader has memory and will stretch and return, preventing the line from breaking. Again, make sure your leader can handle the fish and also match your gear. The video above demonstrates how to use these supplies to create a simple and effective rig for fishing in the surf here on Oak Island when targeting blues and small sharks. Baits for SharksBig sharks like big baits. That frozen shrimp we bought at the Beach Pantry might work for whiting but it's not going to work for sharks. Sharks require something a bit larger and bit more tasty. Depending on the species of shark targeted, selecting the right bait is equally important. Finger mullet: Packs of frozen finger mullet are available where most bait is sold. The packs usually consist of a variety of different size fish. Fishing with the largest in the pack can produce results. This is one of the more easily obtainable baits (yes, they sell these packs at the Beach Pantry) and while they do work, they also attract other fish such as dogfish and blues. Dogfish in particular can clean off a finger mullet almost as efficiently as a pinfish can clean off a piece of shrimp. Check your bait regularly and don't be surprised if there is only a head left on your rig. Cut bait: Bridling a piece of cut bait can be very effective for catching sharks. The larger piece of fish means dogfish have a harder time picking off the bait without being noticed. Local fish markets like Clems often sell large mullet and other bait fish that can be cut into pieces and used for bait. Another option is to catch your own. Pinfish, whiting and blues make excellent bait for sharks.  Live bait: This is the best bet when fishing for sharks. Sharks can detect the movement and electrical impulses of the live fish which give this bait the advantage over a cut piece of fish. The disadvantage to using live bait is that you have to have live bait. This means catching it prior to going fishing, in which case the fish will need to be stored in some manner as to keep it alive. One method is to bring two poles to the surf; one with a shark rig and one with a double drop rig. Fish with the double drop rig till a bait fish is caught, then switch out to the shark rig. Crab: All the previously mentioned baits will catch sharks. However, if you are targeting bonnethead, using crab for bait is the way to go. Blue crabs can be caught from the public docks in the ICW or Davis Canal using a crab line with a piece of cut bait or chicken neck tied to it. Lower the line into the water, wait a bit, then pull it up. Make sure you have a net to scoop the crab out of the water. Minimum crab length is 5". Make sure you check the NC regulations. Crabs can be fished whole or in pieces. The video above demonstrates how to rig crab for fishing bonnetheads in the Oak Island surf. Cleaning and Cooking SharksCan you eat shark? Yes. Does it taste good? Well, that question is up for debate. Some people like to eat shark while others find it horrible. Like all fish, proper handling and preparation can go a long way in determining if a fish will make good table fare and shark is no exception. First thing to know is that sharks urinate through Their skin. When the shark dies, the urea in their blood begins to break down into ammonia which then gets absorbed in the meat. For people who do not like the taste of shark, this is most likely the reason. However, this can be minimized by bleeding and gutting the shark immediately. In other words, as soon as you catch it on the beach, cut the fishes gills and also at the tail and let it bleed out. Once it has bled out, gut it. This should reduce the ammonia flavor. The results should be a meaty, white fish. Make sure you know the regulations when it comes to harvesting sharks. Also keep in mind that bleeding and gutting a shark on the beach may upset tourist. These annual beach goers who were momentarily amazed by your catch, may now be horrified by your actions.
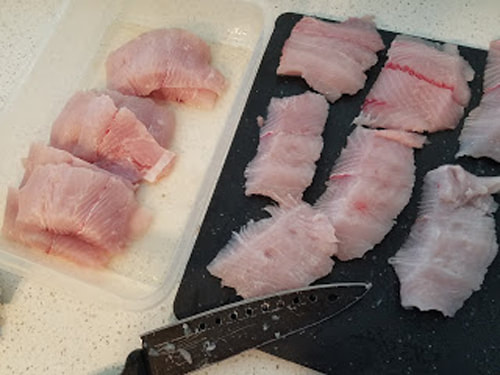
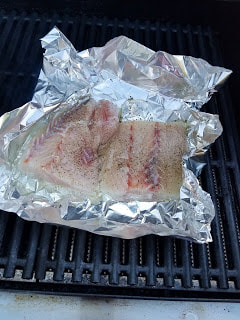
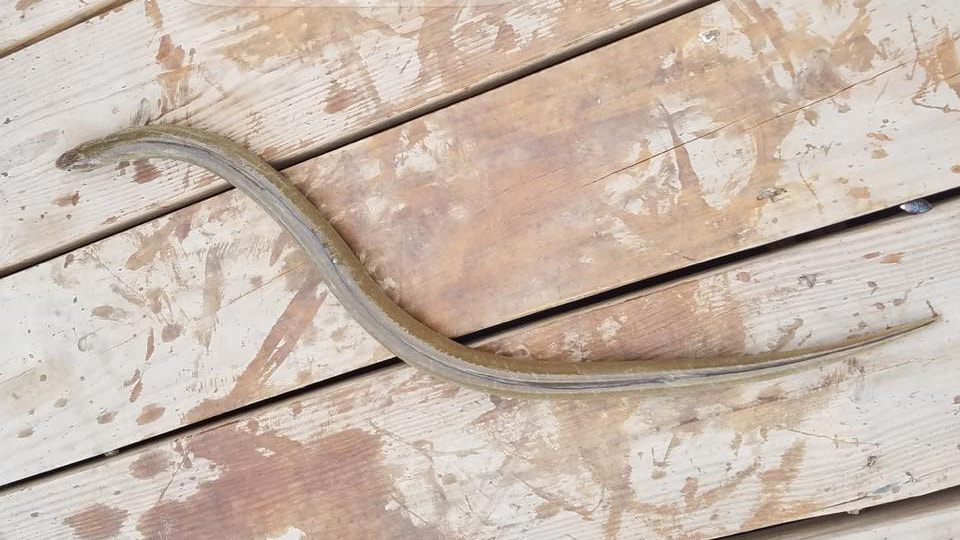
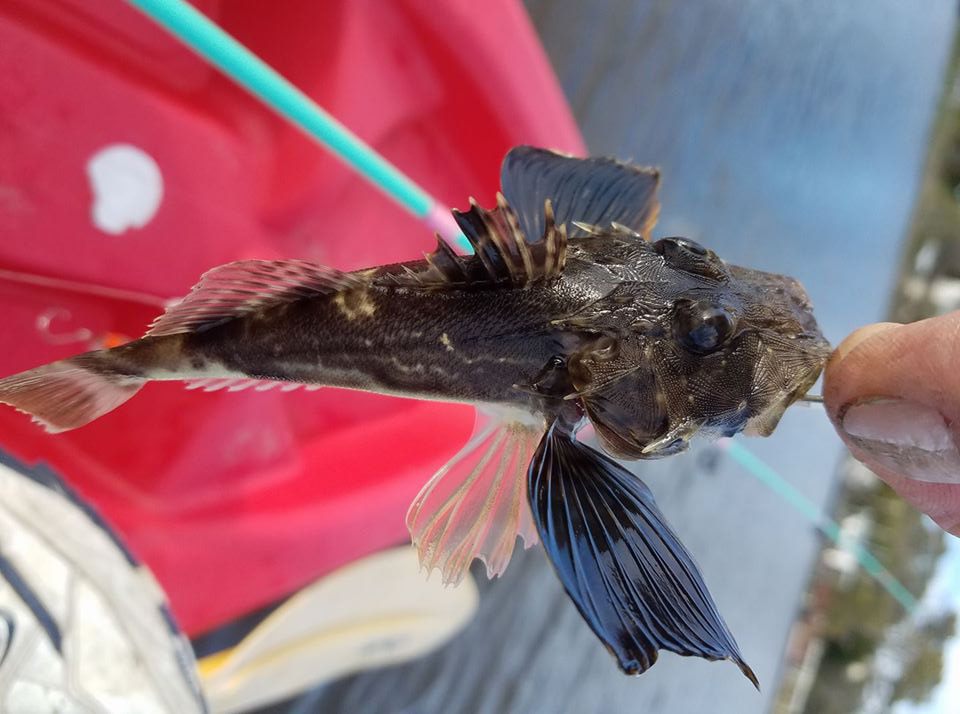
Making rigs, learning about species, selecting bait and catching sharks is a lot of work and not for the faint of heart. If you're a weekend fisherman who is happy just catching a whiting or two, shark fishing may not be for you. However, for those who like a challenge, when the rod bends and line starts screening, shark fishing can be an exciting experience. 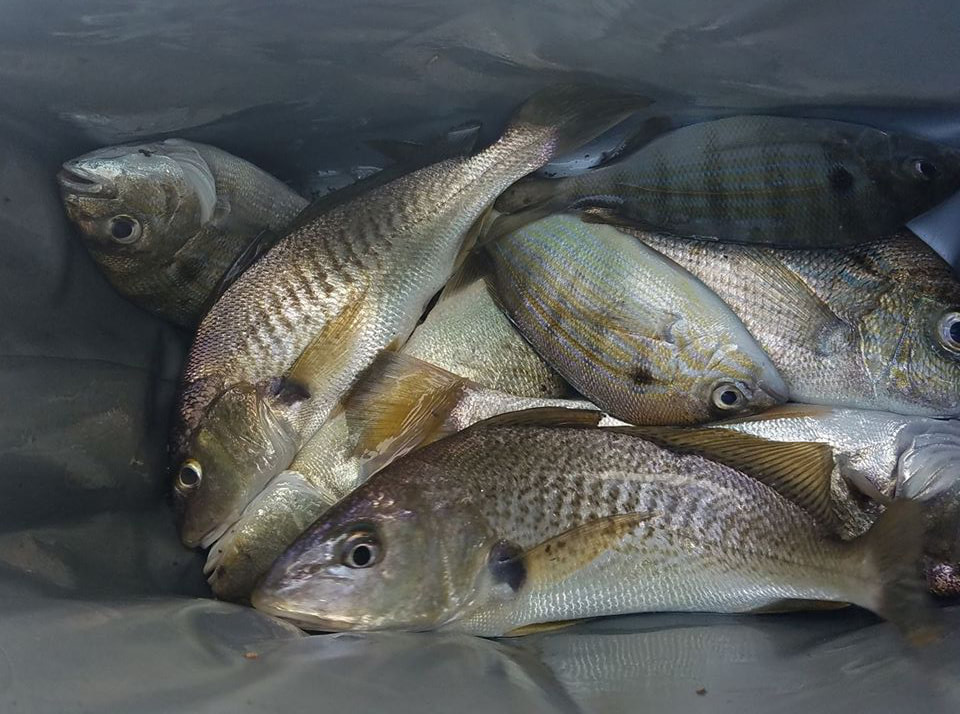 With the beaches still closed, the only fishing spot available seems to be Davis Canal... and that's only if you have access to it. All public boat ramps, including kayak ramps are closed. Eventually, hopefully, things will start to open again. The ban on beach access will be lifted and fisherman will once again hit the surf. This doesn't mean that Davis Canal needs to be dismissed. On the contrary, there's plenty of good fishing happening in the canal year round. If you're looking for sharks or monster blues you might be disappointing. That doesn't mean there aren't large fish in the canal. Slot red drum, speckled trout and decent sized black drum are frequent visitors to the canal. With the right bait, the right timing and a little luck, you can take home a cooler full of fish. If you're just looking to have some fun and catch some fish and you aren't too finicky about what ends up on the end of your hook, your even more in luck. The canal is always full of croaker and other panfish that can be caught on a basic double drop rig and frozen shrimp. You might also be surprised at a few other species you might catch fishing Davis Canal. It's not uncommon to hook an eel on shrimp, especially if you're fishing around dusk. Sea robins can also be an unwanted bycatch. Fishing Davis Canal will produce different results depending on the time of year. In the spring, you might be lucky to land spot or silver perch. All you need for panfish is a double drop rig and shrimp or Fishbites. In the summer, you'll definitely attract croaker, especially if your using shrimp. It's doesn't mater what type of shrimp either, be if its frozen, fresh or live. However, you might also get lucky and land a summer flounder. For flounder, it's hard to keep the croaker off live shrimp so try throwing gulp. In the fall, the trout and the black drum move in. I've caught some of my best drum in the canal in the fall. For trout, soft plastics like artificial shrimp or paddletails work well. Black drum will seek out shrimp or sand fleas. There is one other critter you might run into fishing in the Davis Canal; an alligator. In my experience, they tend to leave people alone. I've bumped into a few small ones when I've been out on the kayak and as soon as they've seen me, they've dived down under the water. I have seen a few large ones from the boat and they too tend to move along. I''m not sure what a large gator would do if we ran into each other while I was in the kayak. I'm hoping we would go our separate ways. So far I've been lucky enough to not have to find out. If you want to see the big one, watch the video below. Fast forward to just past the 2 minute mark. Wanna guess how big she is? Bigger than a bread box, that's for sure. Many a deer hunter began their hunting career at an early age by aiming their shotguns at squirrels. For fisherman, before the bass hawgs and bull redfish, many wet their first lines catching panfish. My grandparents owned a house on a small lake in Rhinebeck NY and before I ever hooked a bass or a catfish, I hooked a sunfish. As a preadolescent, I would wake up at sunrise, walk onto the dock and lower a worm into the dark water. It wouldn’t be too long before the bobber would dip below the surface. I would proudly return home with a string of brim. My grandfather taught me how to clean them. My grandmother taught me how to cook them in a frying pan full of butter. When the saltwater fisherman of today imagines the pictures he’ll post on his social media account, he probably envisions something more like a gator trout or citation black drum than a spot. After all, spot, like their cousins the croaker and the silver perch, aren’t very impressive. These types of fish are more often considered as bait to catch fish, not the targeted species. However, with light tackle, these little fish can lead to a fun and exciting afternoon of fishing. Plus, they’re good table fare. 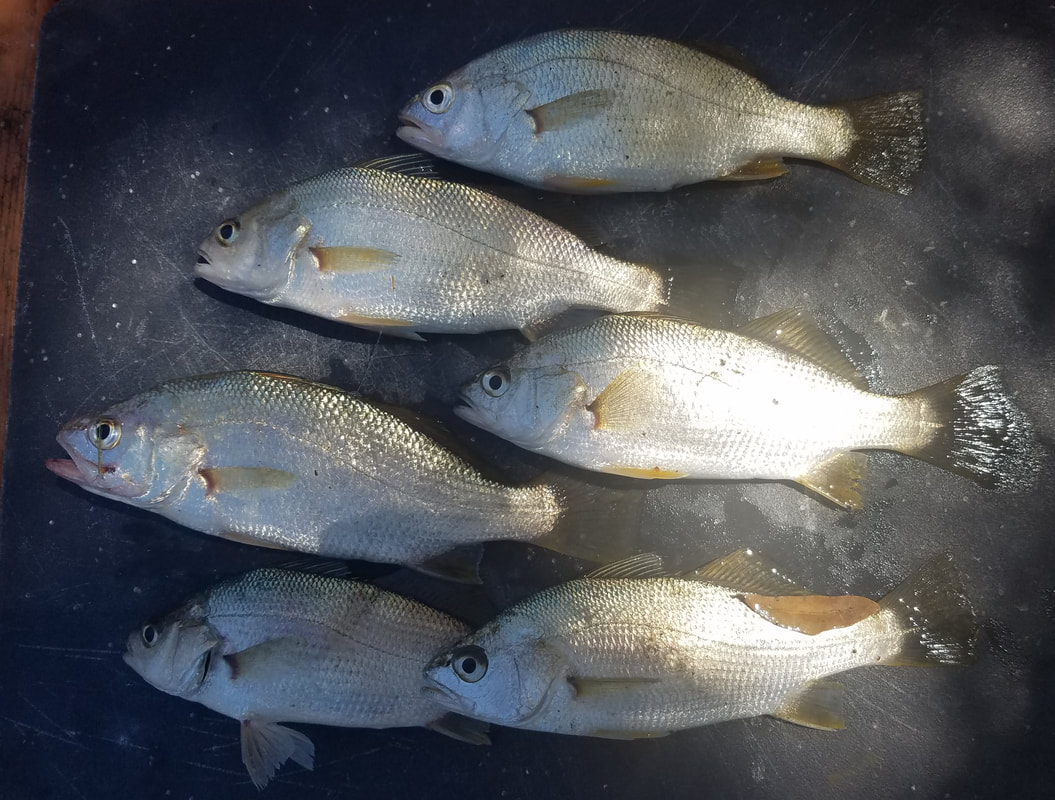 SpotSpot can be identified by the prominent spot behind the gill cover. However, spot can often be confused with croaker and pinfish. Unlike the pinfish which has one, spikey dorsal fin, the spot has two dorsal fins. The have a downward mouth, similar to a black drum. Unlike the croaker which has a rounded tail, the spot has a forked tail. Spot can often be found right in the center of the canal. They will eat shrimp but can’t pass up a bloodworm. Since bloodworms can often be pricey, an alternative is to use bloodworm scented Fishbites. I like to make a combination, shrimp/Fishbite cocktail. A double drop rig with a light weight will work fine. Small circle hooks nothing bigger than a 1/0 will work well. 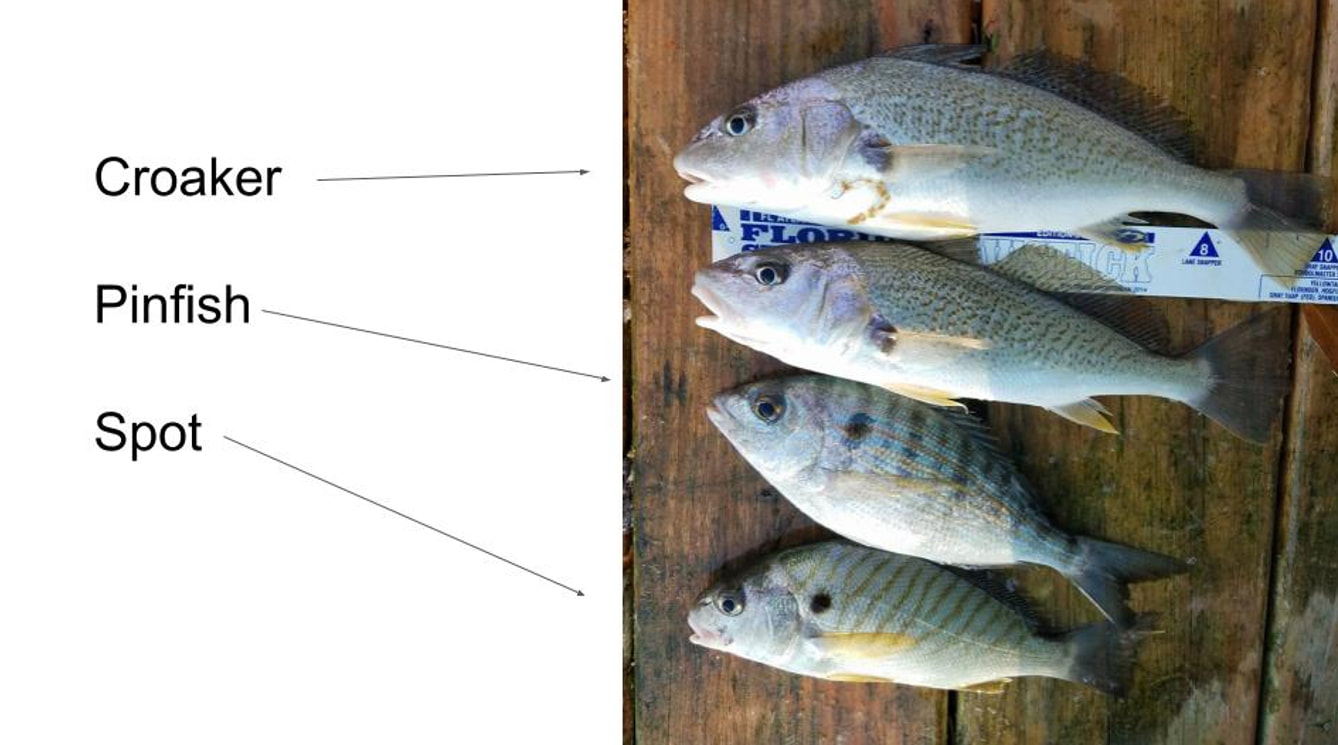 Silver Perch Silver perch aren’t as hard to differentiate from spots, croakers or pinfish. Their bodies are silver and there are no confusing spots. Silver perch can be caught closer to the grass than spot. They are often in schools so if you catch one, chances are good that you’ll catch a few more. The same bait and rig set up used to catch spot will work equally well with silver perch. If you’re using light tackle, don’t be surprised if these fish put up a good fight. They are quiet feisty for their size. Croaker Croaker have big heads, tough gills, and growl (or croak) when you catch them. Since their heads are so big, there isn’t as much meat on them as you might think. For this reason, I only like to keep the largest of the croaker. Croaker don’t but up much of a fight and even the little ones are easily caught. I’ve caught croaker that are only a few inches long. It’s surprising they can even get their mouths around the hook. Like spot, croaker also hang out in the middle of the canal. They also can be found around the edges of the grass too. In fact, they are every where and once they figure out the bait is coming, they will stick around. This means you can catch a lot of croaker in a short time and not catch much of anything else. CookingBoth spot and silver perch make good table fare. Spot can be fried in a pan with salt, butter and lemon juice just like my grandmother taught me to cook bluegills. Some choose to bread and fry them in oil. Because of their relatively small size, spot are often gutted and scaled and then cooked whole. Silver perch smoke well and make a tasty smoked fish dip. 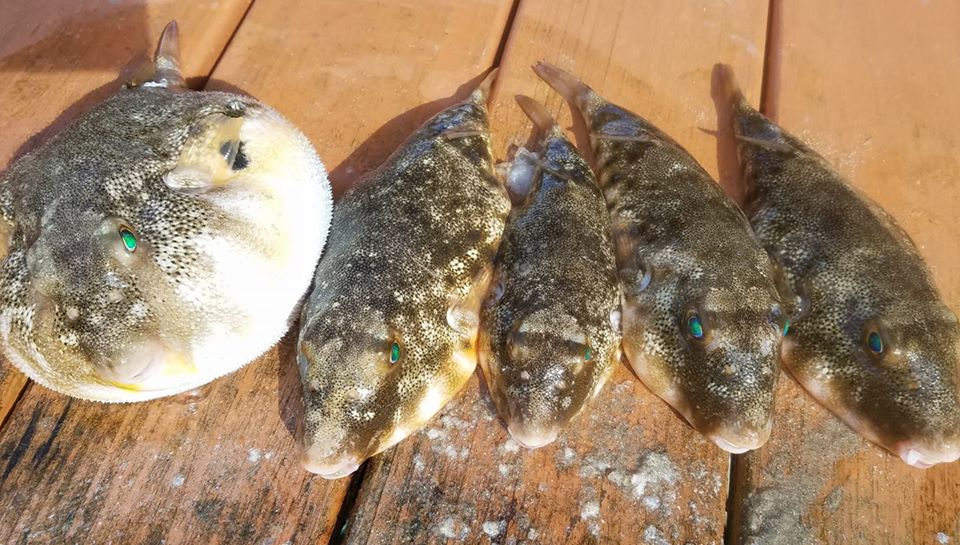 March on Oak Island. The water temperature is below 60 and there's not much biting but puffer. That's great news! It's true that puffer don't put up much of a fight, unless you like the feeling of dragging in a football. However, they do make excellent table fair! I know what you're thinking, "You eat those things? I thought they were poisonous." This is a common misconception. The Japanese puffer, found in the Pacific Ocean can contain the neurotoxin tetrodotoxin, an extremely potent poison. However, the puffer we catch in the surf of North Carolina is the northern puffer which is not poisonous at all. Video: Puffer & the Pirates Deck How to Clean Puffer In this video above, we take a look at how simple it is to catch and clean puffer. We also stop by the Pirates Deck to check out their four pepper wings! However, if you're only interested in learning a quick and easy way to clean puffer, skip ahead to 7:30. Catching Puffer Catching puffer is reality easy. You can purchase a store bought double drop rig or make your own. Fishing with a small, #1 circle hooks will work fine, though some people prefer to use a j hook. Fresh shrimp is always best when fishing but puffer aren't all that picky. Puffer will eat frozen shrimp, squid and even cut mullet. 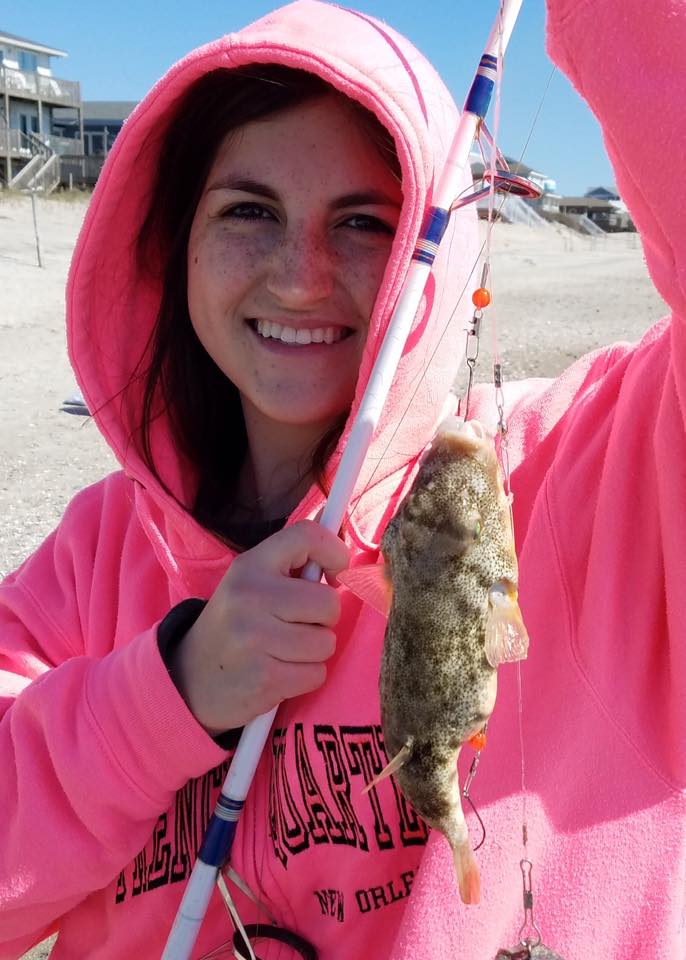 Pay Attention to the Rod. Unlike whiting or bluefish, puffer don't make a big initial hit. Instead they sort of suck on the bait. Sometimes, if you are not holding your rod, they can take the bait without you even knowing they were there. Because of this, it's best to pay attention to your rod as opposed to leaving it in a sand spike. When you feel the tap tap, reel it in. At first you won't feel much. Puffer don't put up much of a fight. Then, the rod will feel very heavy, as if you have snagged a large clump of seaweed. This is because the puffer will puff up as you reel it in, making it feel very heavy. Video: How to Make Fish Tacos with Puffer Cleaning and Cooking Cleaning puffer is easier that you might think. As mentioned earlier, Watch the first video, scroll to the end, around 7:30, to see how to clean the puffer. Unlike most fish, there is no need to filet them. Instead, a fork is used to peel the meat away from the rest of the fish. Fried puffer is very tasty! You don't need to worry about the bones. They come out in one single piece, more like cartilage than tiny bones you find in other fish. 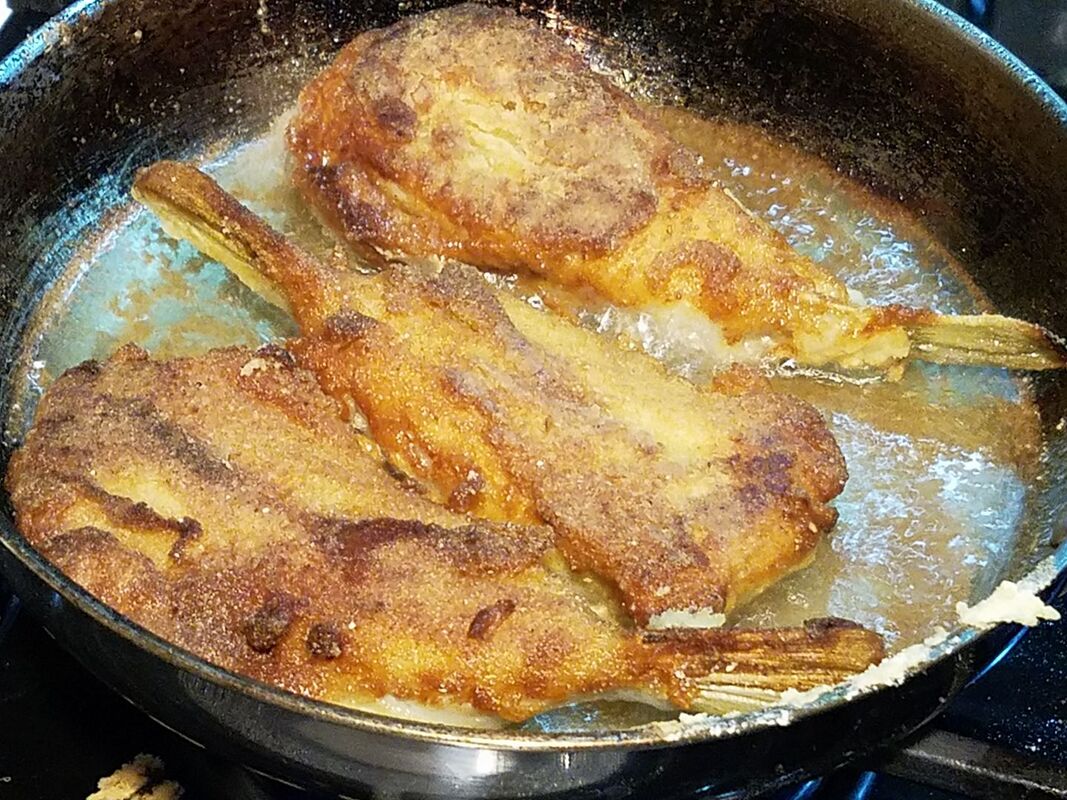 |

Ian SandsFish along with Ian Sands of 'Sands in the Surf' on beautiful Oak Island, NC. We’re fishing the surf and surrounding areas targeting everything from puffer, to blues, to black and red drum, to sharpnose and bonnetheads. 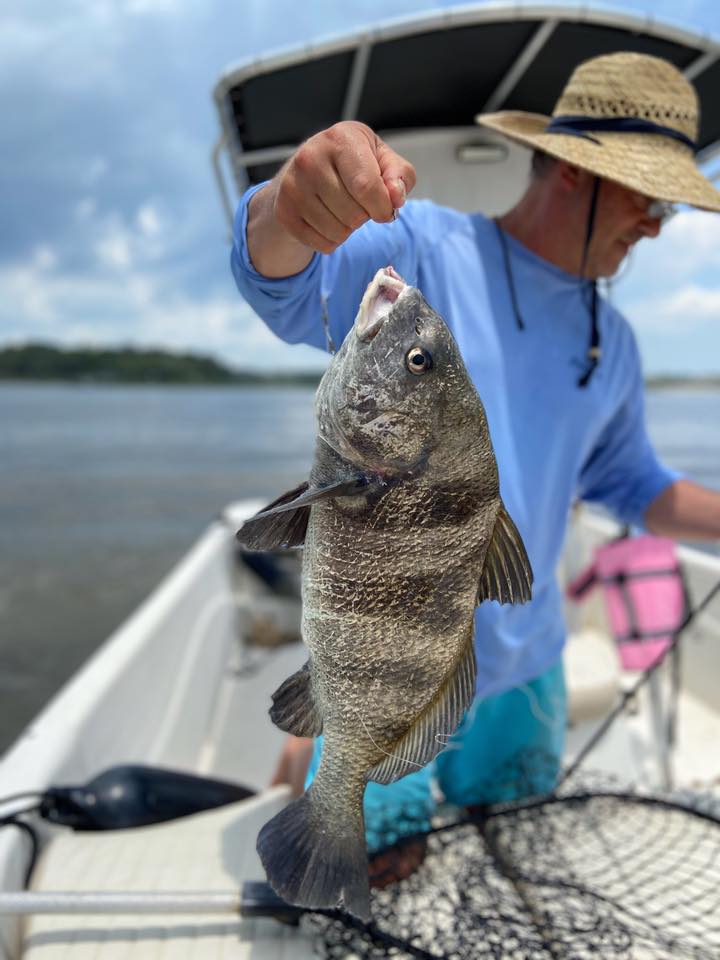
Archives
February 2021
Categories |

 RSS Feed
